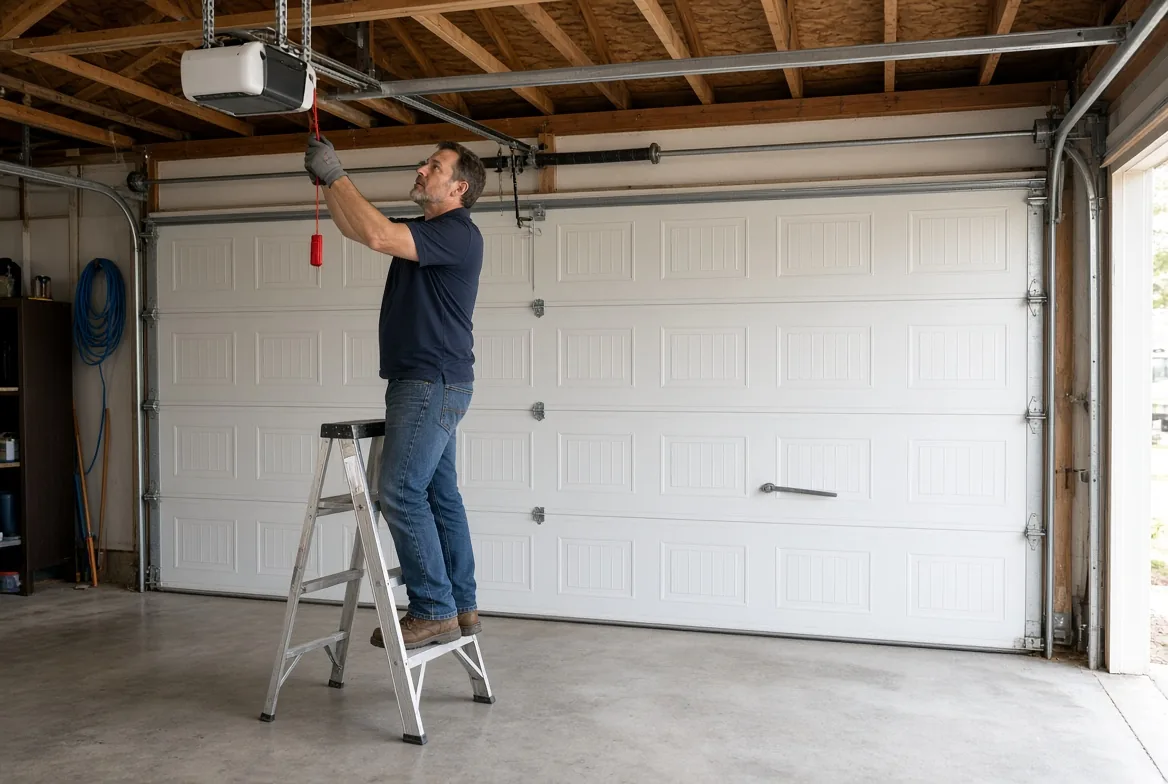
The short version
- Release the door when it is fully closed. Every manufacturer repeats it: pull the release on a raised door and it can come down without warning if the springs are weak or broken.
- The red cord disconnects the opener — nothing more. UL 325 requires the release handle to be red and reachable 6 ft above the floor, so on a closed door it hangs from the trolley near the front of the rail. It does not lift the door and it does not fix anything.
- Pull straight down to free the trolley; on T-rail units pull down and then back toward the opener to latch it out. Wall-mount (jackshaft) openers release with a firm pull down until it clicks.
- The safety gate is the balance test: a sound door lifts with about 10 lb and stays where you leave it 3–4 ft off the floor. Heavy, slamming, or will not stay open means a counterbalance fault — put it down and call a technician.
- Locked out with no power? Only three answers: an exterior keyed release kit ($12–$30), a battery-backup opener (battery $40–$76, 20–50 cycles), or a second way in. All three have to be bought before the outage — remotes, keypads and apps need power at the opener.
A garage door opener does not lift the door; it swings an arm attached to a trolley that rides the rail, and the counterbalance springs do the real work. When you need to open garage door manually — dead opener, dead power, or a door you simply must get past — you are removing that one link between motor and door and taking over with your hands. That takes about ten seconds of pulling plus as long as it takes you to raise the door, and it costs nothing. What it demands instead is judgement, because the moment the release cord is pulled the door is resting entirely on its springs, and a 150–280 lb slab that is no longer counterbalanced behaves very differently from a door the opener is holding.
This guide covers the release itself, the order you do it in, how to hand the door back to the opener without leaving it permanently disengaged (the "opener runs but the door does not move" trap), how to recognise the point where you must stop and call someone, and the two pieces of hardware that make the next outage a non-event: a keyed exterior release and a battery backup. If the door will not move for another reason, the 12-cause troubleshooting guide and the brand-by-brand opener guide pick up where this page leaves off.
What the emergency release cord actually does
The release breaks the mechanical link between the opener and the door, and only that link. It is a lever inside the trolley, held closed by a spring, with a red cord hanging from it.
| Part | What it is | What the release does to it |
|---|---|---|
| Trolley (outer trolley) | The block that travels along the rail, pulled by the chain or belt | Stays with the rail; it keeps cycling even though the door does not move |
| Carriage / inner trolley | The piece clipped to the door arm that actually pulls the door | Released — the door arm is left free to swing |
| Release arm and spring | A spring-loaded arm inside the carriage | Pulling the cord extends the spring and snaps the arm vertical, unlocking the pair |
| Release cord and handle | The red cord hanging from the trolley | What you pull — straight down, or down and back toward the opener, depending on the rail |
Two details are worth knowing before you go looking for it. First, the handle is red by law and reachable at 6 ft: UL 325, codified for residential operators in 16 CFR part 1211, requires "the gripping surface (handle)" to be coloured red, easily distinguishable from the rest of the operator, and capable of being adjusted to 1.8 m (6 ft) above the garage floor. DASMA's inspection checklist (TDS-167) tests exactly that. Second, the cord is not on the door — it hangs from the trolley near the front of the rail when the door is closed, so you find it by looking up at the rail, not at the panels.
Most current openers have two released states, not one. Pull the cord once and the trolley is simply disengaged; on T-rail units, pulling it down and then back toward the opener latches the trolley in the released position — Chamberlain calls this a lockout, and it exists so the door does not re-grab the opener every time you cycle it during an outage. The difference matters when you come to reconnect, which is why the brand table further down exists.
The one thing the release will never do
It does not raise the door, and it does not make the door safe to be under. Chamberlain's own warning is blunt: "NEVER pull the emergency release handle to raise or lower the door." The cord frees the door; your arms and the springs lift it.
Rule one: release the door only when it is fully closed
If you take one instruction from this page, take this one: use the emergency release with the door fully closed, and if the door is already open, get it down first — with the opener if the opener still runs, or with a professional if it does not.
The reason is counterbalance physics, not caution for its own sake. Springs, not the opener, carry the door's weight, and they are at their most loaded with the door down. When the door is up, the opener's arm is often the only thing holding a weakened spring system in check. Chamberlain's support guidance says it plainly: "ONLY use the emergency release when the garage door is fully CLOSED, if possible," because doors "are heavy and rely on spring tension. If the springs are weak or broken, the door may fall rapidly and without warning." LiftMaster's own manual adds the mechanism: if the door is open when the handle is pulled, the door can close inadvertently if it is not properly balanced.
So the pre-flight list before you touch the cord looks like this:
- Door fully closed. Nothing and nobody under it, pets included.
- Power actually off — unplug the opener or trip its breaker at the panel. Switching it off at the wall control is not enough: a remote in a pocket, a keypad, a timer or an app can cycle the door while your hands are in it.
- Manual lock disengaged. If the door has a slide bolt or keyed handle (common on single-bay and vault-style doors), release it first. Lifting a locked door bends hardware.
- Hardware check: a quick look at the springs, cables and rollers. Do not proceed if any of them looks broken or damaged — that is the next step in detail.
- A second person if you have one, particularly if the ladder is the only way to reach the cord.
⚠ A stuck-open door is a counterbalance problem, not a lifting problem
If the door will not come down and the opener is dead, do not pull the release and try to walk it down. A door that descends faster than you are lowering it has already told you the springs are not holding it. Chamberlain lists exactly this case — door will not stay open, door falls quickly — as a stop-and-call-an-expert condition. Our broken spring guide covers what that visit involves.
How to open garage door manually: 6 steps
The whole procedure is short, and every step exists to keep the door's weight under control. Work in this order and the manual open is a two-minute job; skip step 2 and you can be lifting a door that is about to become the problem.
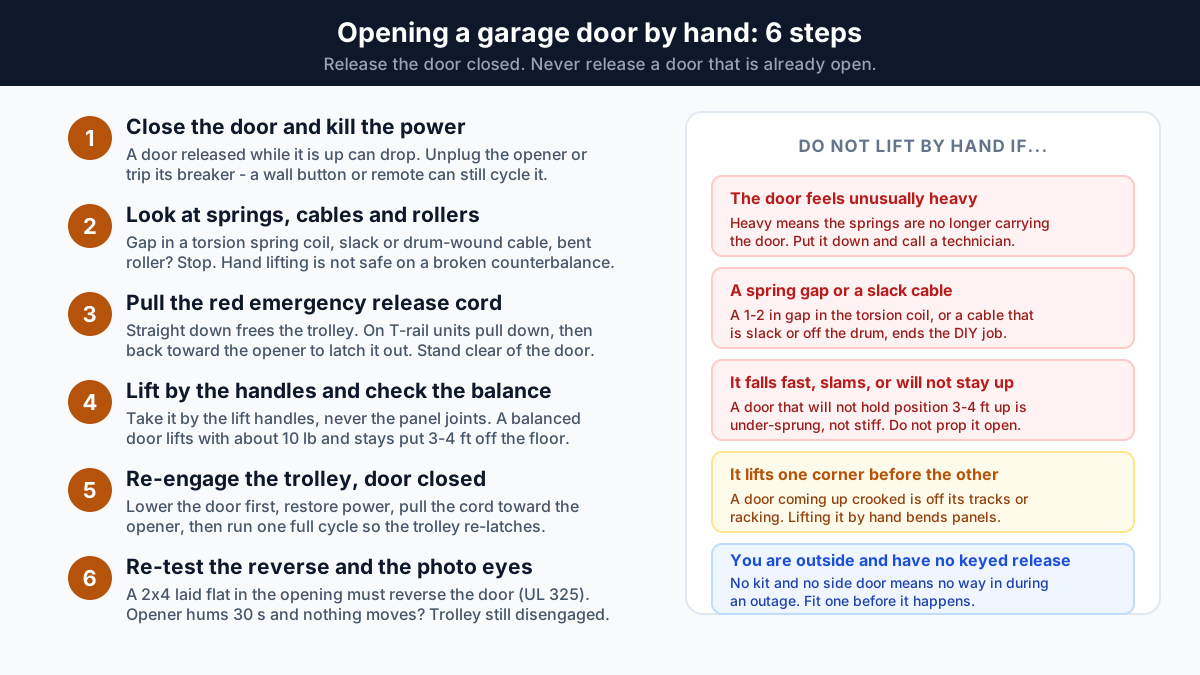
1. Close the door and kill the power
Put the door down, clear the opening, and cut power at the plug or the breaker. This step protects you from the opener itself: a released door plus a live opener is a machine that will happily run its trolley back and forth — and on some models re-latch itself — while you are working. If you are doing this during an outage, the power is already off, but pull the plug anyway; a generator, a UPS or a battery-backup opener can bring it back to life mid-job.
2. Check the springs, cables and rollers
This is the step that decides whether you continue, and it takes thirty seconds. Look at the torsion springs above the door: a broken spring shows as a gap of roughly 1–2 in in the coil, and it is unmistakable once you know what you are looking for. Look at the lift cables either side of the door for slack, kinks or cable wound off the drum. Look at the rollers for flat spots, cracks or rollers popped out of the track, and at the panels for a door that is visibly crooked.
Any of those findings ends the manual open. Not because the door will not move — it might, if you pull hard enough — but because a door that is only movable by pulling hard is a door that is going to come back down the moment you stop holding it. CPSC's investigation history is the reason the instructions are as firm as they are: 62 deaths and 49 injuries to children under 15 were reported between 1982 and 1996 from automatic garage doors and openers, with at least six of the investigated incidents involving broken or detached springs.
3. Pull the red emergency release cord
Stand to the side of the door, not under it, and pull the cord as your opener's rail style requires:
- Chamberlain/LiftMaster, square rail: pull the red cord straight down. The release arm snaps to the vertical position.
- Chamberlain/LiftMaster, T-rail: pull straight down, then back toward the opener to latch the trolley out of engagement.
- Wall-mount / jackshaft openers (LiftMaster 8500, Genie wall-mount): pull the handle down firmly until you hear a click. Chamberlain warns that wall-mount systems tightly control torsion-bar rotation, so if manual movement is difficult or noisy, stop and call a technician.
- Genie / Overhead Door: pull down on the emergency cord to release the carriage. If the cord will not release it, Genie's alternative is to remove the clevis and cotter pin from the carriage or the door-arm bracket.
Do not assume the release worked — verify it. On Chamberlain and LiftMaster units the release arm should now sit vertical; on Genie units, pulling the cord back toward the interior should show the spring inside the carriage elongated. If nothing has changed, the door is still coupled to the opener, and lifting it means fighting a machine that is still attached.
4. Lift the door by its handles and check the balance
Take the door by its metal lift handles and raise it smoothly, letting the springs do the work. ANSI/DASMA 116 calls for four gripping points on a residential sectional door, within 8 in of the bottom edge of the bottom section, and DASMA is explicit that the section-to-section joint is not a gripping point: sections close on each other as the door moves and fingers between them get hurt.
Now the test that tells you whether the door's counterbalance is healthy:
- A balanced door lifts with about 10 lb of effort and stays where you leave it when you let go 3–4 ft off the floor. That is the pass condition DASMA publishes and CPSC echoes — a properly operating door "will stay in place when stopped in any partially-open position".
- An unbalanced door feels heavy, drifts or sinks when you release it, slams down instead of drifting, or lifts one corner before the other. Every one of those is a stop signal: Chamberlain's list is "if the door feels unusually heavy, will not stay open, or slams shut, STOP immediately and contact a garage door professional".
| Door size | Typical weight (single/double-layer steel) | Liftable by hand? |
|---|---|---|
| 9×7 ft single car | Roughly 140–190 lb | Only with working springs carrying almost all of it |
| 16×7 ft double car | Roughly 155–280 lb | Only with working springs; much harder to control by hand |
| 16×7 ft solid wood or insulated wood-composite | Over 400 lb | No — a manual open on tired springs is not viable |
None of that weight is supposed to reach your arms. If it does, the springs have stopped doing their job, and the manual open is the moment you find out.
5. Re-engage the trolley with the door closed
Hand the door back to the opener with the door fully closed and the power restored. Re-engaging a raised door is how doors get dropped: with the trolley catching a door that the springs are no longer holding, there is nothing underneath it but the floor. Pull the cord as your brand requires (table below), then run the opener through one full open and close cycle — most current openers re-latch themselves on that cycle, and if it does not catch the first time, run one more.
6. Re-test the safety reverse and the photo eyes
Finish by proving the safety systems still work: lay a 2×4 flat in the opening, or a 1-1/2 in high object, and the door must reverse on contact with it — that is the UL 325 entrapment requirement. Break the photo-eye beam while the door is closing and it must stop and reverse. If either test fails, do not adjust your way around it; the sensor guide covers the alignment and yellow-light faults that cause most failures. The full annual sequence, including travel limits and force settings, is in the tune-up checklist.
How to re-engage the opener afterwards (by brand and rail style)
Reconnection is the step that produces most of the support calls after a manual open, because the detail differs by opener and the symptom is identical: the opener runs, the door does not move.
| Opener style | To disengage | To re-engage |
|---|---|---|
| Chamberlain / LiftMaster, square rail | Pull the red cord straight down; the release arm snaps vertical | Pull the cord toward the opener (arm returns horizontal), then run the opener through a full cycle |
| Chamberlain / LiftMaster, T-rail | Pull straight down, then back toward the opener to lock the trolley out | Pull the cord straight down, then operate the opener; it re-latches on the next cycle |
| Wall-mount / jackshaft (LiftMaster 8500, Genie wall-mount) | Door closed and manual lock off, pull the handle down firmly until it clicks | Pull the handle down firmly until it clicks, then operate the opener |
| Genie / Overhead Door (belt, chain, screw) | Pull down on the emergency cord to release the carriage | Move the door back to the position it was in when released, pull the cord up and toward the motor (or toward the door, on some models), then operate the opener |
| Genie, cord will not release it | Remove the clevis and cotter pin from the carriage, or from the door-arm bracket | Refit the clevis and pin, lift the disconnect lever up, and run the door until shuttle and carriage lock together |
Two diagnostic details save a service call. If the opener hums for about 30 seconds while the door sits still, the door is simply not connected — reconnect it with the release handle. If it hums briefly and stops, the cause is one of three things: a broken spring, a manual door lock still engaged, or a trolley jammed on the stop bolt. Chamberlain lists all three as stop conditions, and our opener troubleshooting guide works through the rest of the brand-specific symptoms.
Do not dial the opener's force setting up
It is the classic attempt to make a heavy door move after a manual release, and it spends the margin that lets the door reverse on an obstruction. A door that needs more force has a counterbalance problem, and the opener's force trim is not the fix. More on that in the 12-cause guide.
Locked out with no power and no way in: opening from outside
Everything above assumes you are inside the garage. If you are standing in the driveway with a dead opener, there are exactly three honest answers, and only the first two are hardware.
1. An exterior keyed emergency release kit ($12–$30)
A small keyed cylinder mounts through the top panel of the door with a cable running back to the carriage release. Turn the key, pull the lock assembly out, and the carriage disengages, so the door can be raised by hand from the outside. Genie's kit (GER-R / 37374R, listing at $25.49), Chamberlain's 1702REV and Wayne Dalton's 157277 all work this way, and universal kits sell for roughly $12–$30.
Two honest caveats. Chamberlain underlines the first: "This feature only disconnects the opener. It does not lift the door." If the springs are tired, the kit hands you a disengaged door you still cannot raise. The second is timing: the kit has to be fitted before the emergency, because there is no way to disengage a sectional door from outside without one. One contractor quotes about $150 installed, which is parts plus a service visit — a general repair visit bills a $50–$75 service-call fee with labour at $75–$150 per hour, so that figure is plausible as an all-in price rather than a parts price.
2. A battery-backup opener (battery $40–$76)
Standby packs give roughly 20–50 door cycles during an outage, and the pack is a 12 V sealed lead-acid unit: the LiftMaster/Chamberlain 485LM (41A6357-1) lists at $60.95–$75.99 from parts dealers and commonly sells for $40–$60, with generic equivalents at $25–$35. Expect to replace it every 1–3 years — a hot garage shortens that — and treat periodic beeping and a red or amber battery LED on the motor unit as the warning that it is on its way out. Do not disable backup to silence the beep in a jurisdiction that requires it: California's SB 969 requires battery backup on all garage door openers installed on or after 1 July 2019, and UL 325 now requires backup capability on new residential openers sold in the US.
3. A side door, or a technician — and never a pry bar
Without a keyed kit the remaining options are the side service door, or calling a garage door technician or locksmith. The kit exists precisely for "vault"-style garages with no secondary access. Do not try to pry or lift a sectional door from one corner: the door racks, the panels and track take the damage, and the release cord is not reachable from outside anyway.
⚠ Apps, keypads and remotes are not outage backups
myQ-style controls, wireless keypads and remotes all need power at the opener, so they fail at the exact moment you need them. During an outage your only outage-proof paths are a keyed release kit, a battery-backup opener, or a second way in. All three are purchased in advance.
Is it safe to open by hand? The 10 lb balance test
A manual open is safe when the door is closed, the hardware is sound, and the door behaves like a balanced door once you start lifting. It is not safe when any one of those is missing, and the balance behaviour is the fastest way to tell.
Do not operate the door by hand — and do not use the release at all — when:
- The door feels extremely heavy, or will not stay open at 3–4 ft.
- The door falls quickly or slams rather than drifting down.
- Springs, cables or rollers look broken or damaged — a gap in the torsion coil, a slack or kinked lift cable, a roller out of the track.
- The door comes up crooked, lifting one corner before the other: it is racking, and hand-lifting it bends panels and pulls rollers.
- The garage is your only entry and you are standing outside it. That is a hardware problem, not a technique problem.
Two standards explain why those lines exist. UL 325, incorporated for residential operators by 16 CFR part 1211, sets the entrapment-protection rules — the door must reverse on obstruction, photo eyes must be present, the release handle must be red and reachable at 6 ft, and the owner's manual must explain the manual release. ANSI/DASMA 102 governs the door and operator as a system, ANSI/DASMA 103 covers the counterbalance, and ANSI/DASMA 116 the gripping points. DASMA's fitter checklist phrase for the balance test is the one to remember: the door should not move "more quickly than the force applied", and it should hold position 3–4 ft above the floor.
Springs, cables and bottom brackets stay off-limits in every case, no matter how the manual open goes. They hold the door's weight, they carry stored energy, and adjusting one to "help" a heavy door reachable by hand is how people get hurt. If the release test has shown the springs are not carrying the door, the fix is a technician's visit — see signs, cost and safety of a broken spring.
What it costs in 2025–2026
The manual open itself is free, and it stays free as long as the counterbalance is healthy. Everything on this table is either prevention you buy in advance or the repair the release test uncovers.
| Item | Cost | Notes |
|---|---|---|
| Exterior keyed emergency release kit (DIY) | $12–$30 | Genie GER-R lists at $25.49; universal kits are the cheap end |
| Same kit, professionally installed | ~$150 (anecdotal quote) | Parts plus a service visit; treat as a contractor's figure, not a national average |
| Garage door repair service call / diagnostic fee | $50–$75 | Some firms charge $75–$120 |
| Repair labour rate | $75–$150 per hr | Applies to rebalancing, cable and spring work |
| Typical repair visit (diagnosis, parts, adjustment) | $155–$265 | Wider band across guides: $155–$379 |
| After-hours or weekend call-out | $150–$500 | The premium for a door that will not close |
| Backup battery (LiftMaster/Chamberlain 485LM) | $40–$76 | List price $60.95–$75.99; replace every 1–3 years |
| Backup battery, generic 12 V SLA equivalent | $25–$35 | Check the connector and dimensions against your model |
| New opener with integrated battery backup | See replace opener | At the end of an opener's life this is often the cheaper path than repair |
Living with a manual door: outage and daily-use habits
Once the door is disengaged during an outage, leave it that way — you re-engage once when the power returns rather than every trip in and out. Three habits keep that safe:
- Engage the manual lock if the garage will be unattended. With the opener out of the picture, the release cord and the lock are the only things between the street and your tools.
- Teach the household what the red cord does — and that children should not operate a manually released door.
- Mind how you leave the door if the springs are tired. A door that will not hold position by itself during an outage is the same door that will drop in normal service, and the repair does not get cheaper with time.
If the outage is going to be long, that is the moment to plan the two upgrades on the cost table above rather than the moment to improvise. If the opener itself is what failed — clicking, humming, dead remotes, flashing LEDs — the opener guide narrows it down by brand, and if the door needs attention tonight, see emergency garage door repair.
Door too heavy to lift, or springs that have stopped carrying it?
A manually releasable door that will not stay open is not a stiffness problem — it is the counterbalance telling you the springs are done, and lifting it by hand is the fastest way to turn a spring repair into a spring repair plus four bent panels. A technician can rebalance the door, replace the springs and re-set the opener in one visit.
Request ServiceWhen to call a professional
Pulling the release, lifting a balanced door and re-engaging the trolley are all homeowner-level work. The line runs in one place: the moment the door's weight is being held by something that is failing, or the moment you are on the wrong side of a door with no other way in.
- The door feels heavy, slams or will not stay open. A counterbalance fault, and the single most reliable sign that the springs need work.
- A spring has a visible gap, or a cable is slack or off the drum. Springs and cables are under extreme tension and are never a homeowner part.
- Pulling the release produced a hum, a jerk or a door that moves unevenly. Sticking trollies, jammed stop bolts and out-of-adjustment openers all need eyes on the hardware.
- The opener runs but the door never reconnects, even after re-engaging by the book and cycling it twice.
- You are locked out, or the garage is your only entry. A technician can fit the keyed release kit and set the door up so the next outage does not strand you.
- Anything happened that you felt rather than saw — a bang from the springs, a cable that snapped, a door that came down faster than you expected. Stop using the door and get it inspected.
Frequently asked questions
How do I open my garage door manually when the power is out?
Close the door first if it is not already down, unplug the opener, then pull the red emergency release cord hanging from the trolley (the part that rides the rail). That disconnects the door from the opener and you can lift it by its handles. A properly balanced door takes only about 10 lb of effort to raise. Do not release a door that is already open: with weak or broken springs a released door can drop without warning, which is why every manufacturer says to use the release with the door fully closed.
How do I open my garage door manually from outside?
Only with hardware you fitted beforehand. An exterior keyed emergency release kit (Genie GER-R, Chamberlain 1702REV and generics, about $12-$30) mounts a small keyed cylinder through the top panel; turning the key and pulling the cable disengages the carriage so the door can be lifted by hand from the outside. Chamberlain is explicit that the kit 'only disconnects the opener - it does not lift the door', so if the springs are bad the kit leaves you with a disengaged door you still cannot raise. Without a kit, the answers are a side service door or a technician; there is no way to open a sectional door from outside by hand during an outage.
My opener runs or hums but the door does not move after I pulled the release. What happened?
The trolley (or carriage) is still in its released position, so the opener is running its rail with nothing attached to the door. Pull the release cord again to reconnect, with the door fully closed, then cycle the opener once. A long hum of about 30 seconds points at exactly this. A brief hum is different and more serious: it usually means a broken spring, a manual door lock still engaged, or a trolley jammed against the stop bolt, and all three are reasons to stop and call a technician.
How do I re-engage the garage door opener after using the manual release?
Door fully closed first, then power on. On Chamberlain and LiftMaster square-rail openers, pull the cord toward the opener and run a full open and close cycle. On T-rail units the trolley is latched out of engagement, so you pull the cord straight down and let the opener's next cycle re-latch it. On wall-mount (jackshaft) openers, pull the handle down firmly until you hear a click. Genie and Overhead Door units want the door moved back to the position it was in when it was released, then the cord pulled up and toward the motor (or toward the door, depending on the model). Never re-engage with the door raised.
How heavy should a garage door feel when I open it by hand?
About 10 lb of effort, and it should stay where you leave it. A balanced door lifts smoothly with modest effort and holds position when you let go 3-4 ft off the floor - that is the check DASMA and CPSC both describe, and a properly balanced door should stay in place in any partially open position. For context, a 9x7 ft single steel door weighs roughly 140-190 lb and a 16x7 ft double door 155-280 lb. If lifting feels unusually heavy, the door falls quickly, slams shut, or will not stay open, the springs are no longer carrying the door - stop, close it, and call a professional.
Is it dangerous to pull the emergency release cord?
Not if the door is closed and the hardware is sound. It becomes dangerous when the release is pulled on a door that is already open, or when a spring, cable or roller is already damaged: those are the cases where the door drops or slides unexpectedly. Stand to the side rather than under the door, keep hands and fingers on the lift handles and never in the section joints, and do not let children operate a manually released door. Springs, cables and bottom brackets stay off-limits entirely - they hold the door's weight and a broken torsion spring shows as a visible gap in the coil.
What does a manual release problem cost to fix in 2025-2026?
The manual open itself is free. A keyed exterior release kit is $12-$30 in parts if you fit it yourself, and roughly $150 installed by a contractor (parts plus a service visit). A garage door repair service call or diagnostic fee runs $50-$75 at most firms, with labour at $75-$150 per hour, and a typical repair visit including diagnosis, parts and adjustment lands at $155-$265. After-hours or weekend call-outs run $150-$500. A replacement battery-backup pack (LiftMaster/Chamberlain 485LM) is $40-$76, or $25-$35 for a generic 12 V equivalent, and lasts 1-3 years.
A note on scope
This is general homeowner guidance, not a substitute for a technician's on-site assessment. Costs are national-average ranges for 2025–2026 and vary with region, door size, opener model and access. The manual release is the one part of a garage door system a homeowner should touch: torsion and extension springs, lift cables and bottom brackets are under extreme tension and are professional work only. UL 325 and 16 CFR part 1211 require entrapment protection, a red release handle reachable at 6 ft and manual-release instructions on every residential opener, and ANSI/DASMA 102 governs the door hardware that release operates. Whenever you move, release or re-engage the door, re-test the safety reverse and the photo eyes before returning it to normal use.