The short version
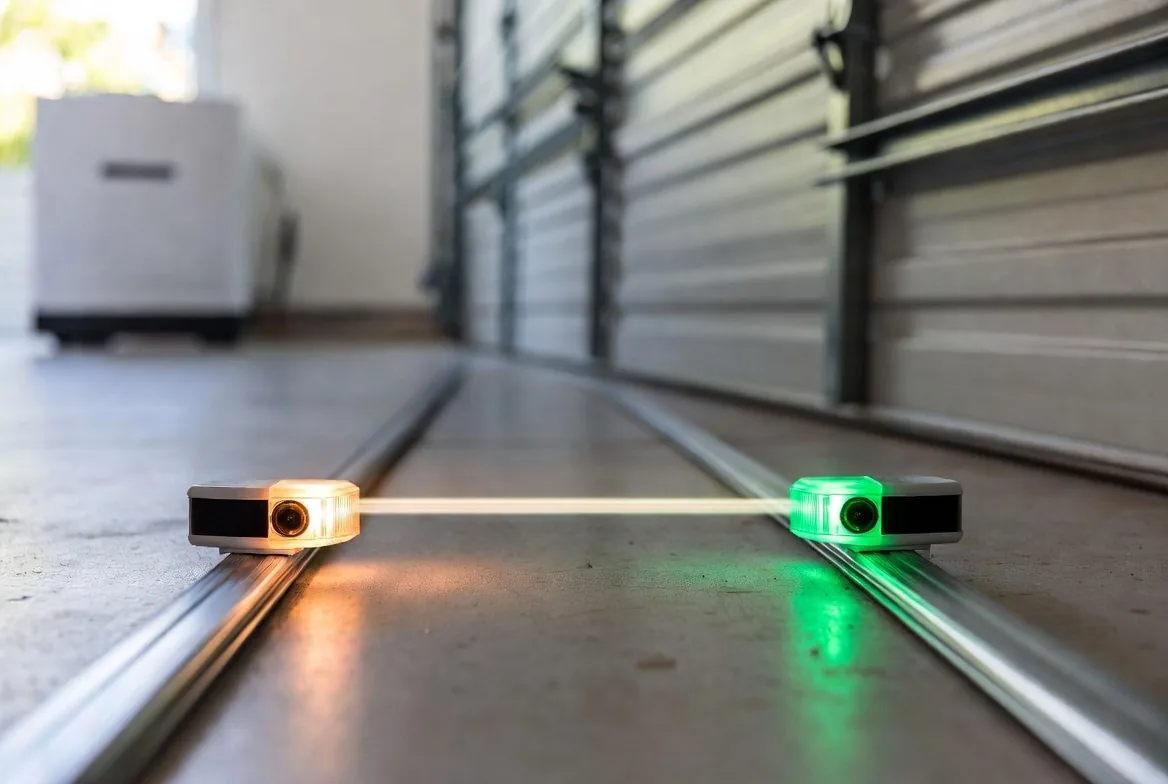
- Read the lights before you touch anything. On LiftMaster, Chamberlain and Craftsman the sending eye is a steady amber/yellow (just "I have power") and the receiving eye is green — and green is the one that matters. Solid green = aligned. Blinking or dark green = broken beam.
- Work in order, cheapest first. Clean the lenses, realign, tighten the brackets, dry out any moisture, shade the receiver from sun glare, then check the wiring. Most "dead" sensors are fixed for free in the first two steps.
- Never bypass the sensors. They're federally required entrapment protection under UL 325. Jumping them is dangerous and illegal — to force a one-time close, hold the wall button until the door is fully shut.
The photo-eyes are the two small sensors near the floor on each side of the door. They shine an invisible infrared beam across the opening; break that beam and the opener refuses to close (or reverses on the way down). Because they live in a dusty, vibrating environment just inches off the ground, they drift out of alignment, collect cobwebs, and get blinded by low sun — which is why "my door won't close" is, nine times out of ten, a sensor problem you can fix yourself in minutes.
How the photo-eye sensors actually work
Each side of the door has one half of a matched pair: a transmitter (sending eye) and a receiver (receiving eye), mounted in a federally mandated window of 4–6 inches above the finished floor. The transmitter fires a continuous, focused infrared beam across the doorway; the receiver has a photodiode tuned to that exact beam. As long as the beam lands cleanly, the opener is allowed to close. Break it — with a foot, a trash can, or a misaligned lens — and the control board instantly stops and reverses the door.
They run on low-voltage bell wire (typically 5–24 V DC) straight from the opener's logic board. Heat expanding the metal tracks, the garage settling, and the constant micro-vibration of the door cycling all slowly nudge the two eyes out of line — which is why a door can work for months and then start "randomly" refusing to close.
Read the light first — yellow, green & blinking
Before you touch a screwdriver, look at the two LEDs. They tell you exactly where the fault is. The colors and patterns vary by brand, so match yours to the table.
| Brand | Transmitter (normal) | Receiver (normal) | Aligned | Fault (blinking / off) |
|---|---|---|---|---|
| Chamberlain / LiftMaster / Craftsman | Amber / yellow | Green | Both solid | Green blinking/off = receiver or alignment; amber off = power loss |
| Genie Safe-T-Beam | Red | Green | Both solid | Red blinking = misaligned/blocked; both off = power or wiring |
| Guardian | Green | Red | Both solid | Either LED flashing or off |
| Linear | Green | Red | Both solid | Green off = no power; red off/flashing = no beam |
| Marantec / Sommer | Green | Red | Both solid | Either LED flashing or off |
The one thing to remember
On the big three brands, the amber/yellow light just means "powered" — it says nothing about alignment. The green receiver LED is the real indicator: steady green means the beam is connecting; blinking or dark green means it isn't.
Fix it in order — the six checks
Run these from top to bottom. Each is cheaper and easier than the next, and most doors are fixed in the first two steps. Unplug the opener before any wiring work.
1. Clean the lenses
- Why it failsThe low, vibrating mounting turns the lenses into a magnet for dust, cobwebs, and insect nests — enough to scatter the beam and trip a false "obstruction."
- DIY fixWipe the convex lens on both housings with a clean, dry microfiber cloth. Skip harsh solvents — they cloud the acrylic. Clear any bins, cables, or lawn gear sitting in the beam's path.
- VerdictFully DIY · free
2. Realign the beam
- SymptomsGreen LED blinks or is out; the door reverses right after it starts down; it only fails sometimes (temperature- or vibration-dependent).
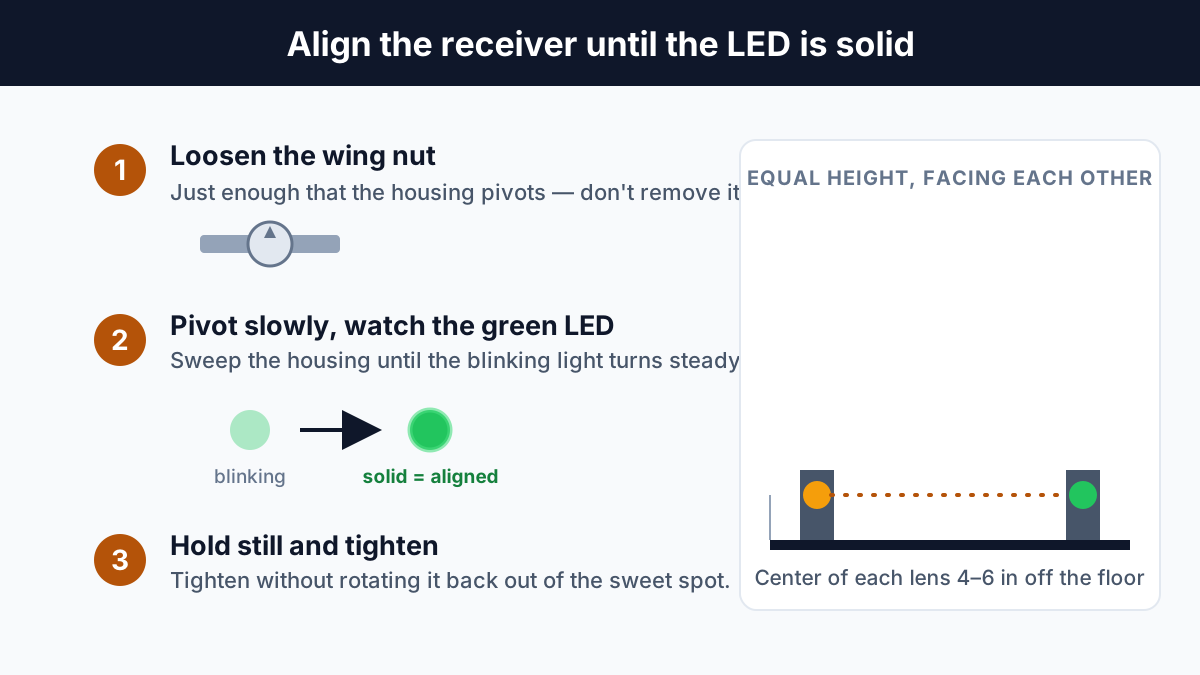
- DIY fixLoosen the wing nut on the receiver bracket, then pivot the housing slowly — horizontally and vertically — while you watch the green LED. The instant it goes from blinking to solid, hold it still and tighten without rotating it back out. Make sure both lenses sit at equal height (4–6 in) and face each other squarely.
- VerdictFully DIY · free
3. Tighten loose brackets
- Why it failsEvery door cycle shakes the frame. Fasteners back out, the bracket drifts, and the beam clips the lens edge — causing intermittent false trips.
- DIY fixWiggle each bracket; if it moves, tighten the lag screws into the track or framing. Add lock washers or a dab of medium-strength threadlocker, and confirm the track itself is anchored.
- VerdictDIY
4. Dry out moisture & corrosion
- SymptomsFlickering or dead sensor after rain, snow, or a wash-down. Water on the lens fakes an obstruction; water on the board shorts traces.
- DIY fixUnplug the opener. If the housing snaps open, dry any condensation with a soft cloth or a hair dryer on cool — never high heat. Brush white/green corrosion off the terminals. Reassemble and run a thin bead of clear exterior silicone along the seam, or hood the sensor with a short piece of PVC.
- VerdictDIY
5. Beat sun glare
- SymptomsThe door only refuses to close at one time of day — low, direct sun floods the receiver with natural infrared and "blinds" it.
- DIY fixSwap the two sensors side-for-side so the green receiver sits on the shadier side (keep wire polarity — white to white, striped to striped). Or recess the lens: slide a 2–4 in stub of cardboard tube or 1 in PVC over the receiver as a shade cone, without clipping the beam. OEM snap-on sun shields also exist (e.g. LiftMaster/Chamberlain part 41B873).
- VerdictDIY
6. Trace wiring faults
⚠ Unplug the opener first
Even at low voltage, work on the wiring with the opener unplugged. If you're not comfortable stripping and splicing low-voltage wire, this is the point to call a pro.
- SymptomsBoth LEDs dead, or one flickers regardless of alignment. Look for crushed insulation, exposed copper, or staples pinching the run.
- The short-wire testUnmount both sensors, cut the leads ~12 in from each housing, strip them, and wire the eyes straight into the opener's terminals (solid white to white common, white/black stripe to the signal terminal). Power up: if both LEDs go solid on the bench, the sensors are fine and the in-wall wiring is the culprit — replace the run.
- Splice fixCut out the damaged section and rejoin with gel-filled low-voltage connectors or wire nuts, crimped firmly.
- VerdictDIY for the handy Pro for in-wall rewiring
Cleaned, realigned, and it still won't stay closed?
If the green light won't go solid or the wiring test fails, a technician can trace it and verify the safety reversal same-day.
Request ServiceTest it safely — the two checks that matter
After any sensor work, run both tests from DASMA Technical Data Sheet 167. If either fails, stop using the opener until it's fixed.
✓ 1. Non-contact beam test
Open the door fully. Press the wall button to close, and while it's descending, wave a broom handle through the beam. The door must stop and reverse instantly — the opener lights usually flash about ten times.
✓ 2. The 2×4 reversal test
Lay a flat 1½-inch board (a 2×4 on its side) across the floor in the door's path and close the door. On contact it must stop within two seconds and reverse. If it just hums and pushes, reduce the close-force limit per your manual and re-test. Never use a paper-towel roll or other soft object — it won't trip the force sensor at the required 1½-inch height.
Replace vs. repair — 2025–2026 costs
Because photo-eyes are a matched, factory-calibrated pair, a damaged sensor almost always means replacing the pair rather than repairing one. The good news: parts are cheap and the job rarely takes over an hour.
| Item | Typical range |
|---|---|
| Universal / off-brand sensor kit | $25–$45 |
| OEM sensor pair (Chamberlain, LiftMaster, Genie, Craftsman) | $45–$100 |
| Diagnostic / service-call fee | $40–$80 (often credited toward the repair) |
| Labor rate | $40–$110/hr (~1 hr max) |
| Complete professional replacement | $120–$230 (parts, labor, travel, safety audit) |
Doing it yourself runs about $25–$80 in parts and an hour of your time; a pro is $120–$230 but includes a full safety check and liability coverage.
Is it legal to bypass the sensors?
⚠ No — and it's dangerous
Under 16 CFR Part 1211 and ANSI/UL 325, every residential opener made on or after 1 January 1993 must have dual entrapment protection: the motor's own force-reversal plus an external monitored device — the photo-eyes. The opener must verify the sensors' presence and wiring every cycle; without a valid signal it is legally blocked from closing by remote. Permanently jumping or disabling the eyes violates code, can void insurance, and has caused serious injuries and deaths. The only legal override is the hardwired wall button held under constant pressure, in direct sight of the door, until it's fully closed.
Brand-specific wiring notes
| Brand | Wiring notes | Diagnostic codes |
|---|---|---|
| Chamberlain / LiftMaster / Craftsman | Terminal 2 (white) = common ground for the two solid white wires; Terminal 3 (grey) = the two white/black striped signal wires. | Code 1-1 = obstruction/misalignment · Code 1-2 = short or reversed polarity |
| Genie Safe-T-Beam | Largely polarity-independent. Older units daisy-chain from the motor head to the red transmitter, then bridge to the green receiver; group solid whites together and striped wires together. | Red blink = misalignment/blockage · rhythmic blinks isolate light interference or internal faults |
Frequently asked questions
Why does the door open normally but refuse to close unless I hold the wall button?
That's a classic safety-sensor fault. Under federal rule 16 CFR Part 1211, the opener is blocked from closing automatically whenever the beam is broken, misaligned, or unpowered. Holding the wall button is a legal manual override — it only works with constant pressure while you watch the door.
How do I tell if the indicator light is yellow or amber?
On Chamberlain, LiftMaster and Craftsman units “yellow” and “amber” mean the same thing: the sending eye glows steadily whenever it has power. It is a baseline power light, not an alignment light — the green receiving eye is the one that tells you the beam is actually connecting.
What causes a flashing green sensor light?
A weak or interrupted beam: the sensors are slightly misaligned so the beam only clips the lens edge, dust or cobwebs on the lens, a loose bracket vibrating out of position, or direct sunlight blinding the receiver. Clean, realign, and tighten before you replace anything.
Can I use universal safety sensors across different brands?
Not freely. Voltages and proprietary signaling frequencies differ, so a Genie Safe-T-Beam can't wire into a Chamberlain/LiftMaster head. “Universal” kits only work with a specific list of supported brands — check them against your opener's model and date before buying.
Is it safe or legal to bypass or disable the sensors?
No. Permanently jumping or disabling photo-eyes violates UL 325 and 16 CFR Part 1211 and can cause serious injury, death, or property damage, plus insurance and liability problems. For a one-time emergency close, hold the hardwired wall button until the door is fully shut.
A note on safety
This is general homeowner guidance, not a substitute for a technician's on-site diagnosis. Cost figures are national-average ranges, and LED meanings and terminal labels vary by brand, model, and year — always confirm against your own manual. If the door won't pass both the beam test and the 2×4 reversal test, stop using the opener and call a pro.