The short version
- Try the cheap, safe fixes first. A dead remote battery, blocked or misaligned photo-eye sensors, an engaged manual or "vacation" lock, a tripped GFCI, and cold-weather stiffness account for a huge share of "dead" doors — and cost little or nothing.
- Never DIY springs, cables, or an off-track door. These are under extreme tension; the CPSC and DASMA warn they can cause serious injury and must be handled by a professional.
- Know your emergency release. The red cord disconnects the door so you can lift it by hand — but only pull it when the door is fully closed, and stop if the door feels extremely heavy.
Several causes — broken springs, snapped cables, an off-track door — are genuinely dangerous and belong to a trained technician. The rest you can often diagnose and fix yourself. Below you'll find how to spot each problem, exactly how to fix the safe ones, what the professional repairs cost in 2025–2026, and the brand-specific quirks for LiftMaster, Chamberlain, Craftsman, and Genie.
A quick first-response checklist
Before you reach for tools — or the phone — run through these four checks. They take a minute and rule out the most common, least expensive problems.
- Try the hardwired wall button. If the wall button works but the remote doesn't, the problem is the remote or the lock feature — not the door itself.
- Read the opener's LED blink code. Count the flashes; they map to specific faults like a sensor, wiring, or lock issue.
- Make sure the door is fully closed before you ever pull the red release cord.
- Don't keep mashing the button if the door moves an inch and bangs — you'll strip the opener gear or burn out the motor against a broken spring.

1. Dead remote or keypad battery
If the wall button opens the door but your handheld remote or keypad does nothing — or only works up close — start here.
- SymptomsWall button works but the remote doesn't; remote only triggers from a few feet away; you have to press several times.
- DIY fixReplace the battery (most remotes use a 3 V CR2032; keypads often a 9 V or AAA) and re-test. Still dead? Reprogram it with the "Learn"/"Program" button on the motor unit, then press the remote within about 30 seconds. Worth knowing: LED shop bulbs in the opener are a known source of radio interference — swap to a garage-rated or non-LED bulb.
- CostA few dollars for a battery.
- VerdictFully DIY
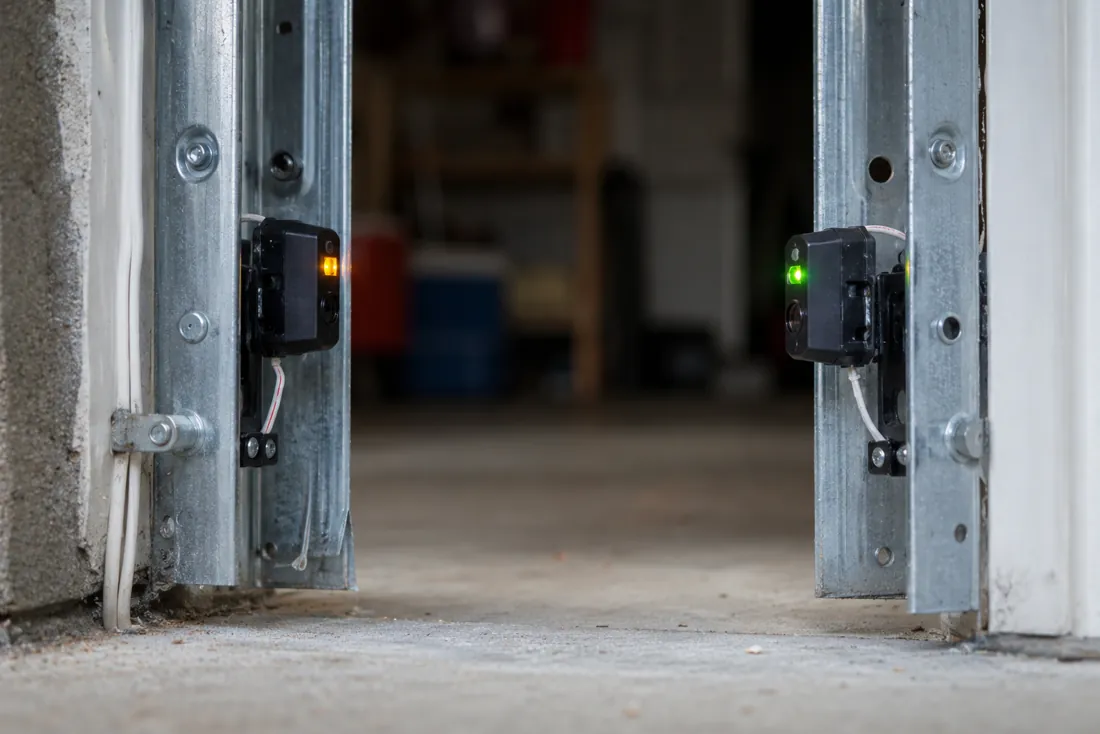
2. Misaligned or blocked photo-eye safety sensors
This is the number-one reason a door opens fine but won't close. Those two small sensors near the floor are federally required entrapment protection — under UL 325, every opener made on or after 1 January 1993 must have them, mounted no more than six inches off the ground.
- SymptomsDoor opens normally but won't close, or closes partway then reverses; the opener light flashes (about 10× on LiftMaster/Chamberlain); one sensor LED is off or flickering. A healthy pair shows a steady amber light on the sending eye and green on the receiving eye.
- DIY fixClear anything in the beam's path and wipe both lenses with a soft, dry cloth. If an LED is off or blinking, loosen the wing nut and pivot the sensor until the light is steady, then tighten — use a level so both sit at equal height. Check the wires for staples, frays, or rodent damage. If it only fails in the afternoon, direct sun may be "blinding" the receiver; shade it or swap the sender and receiver sides.
- CostFree to fix yourself; a replacement sensor pair runs about $50–$100.
- VerdictDIY to clean & align Pro if an LED never goes solid
Never permanently bypass the sensors — they're what stops the door closing on a child, pet, or car.

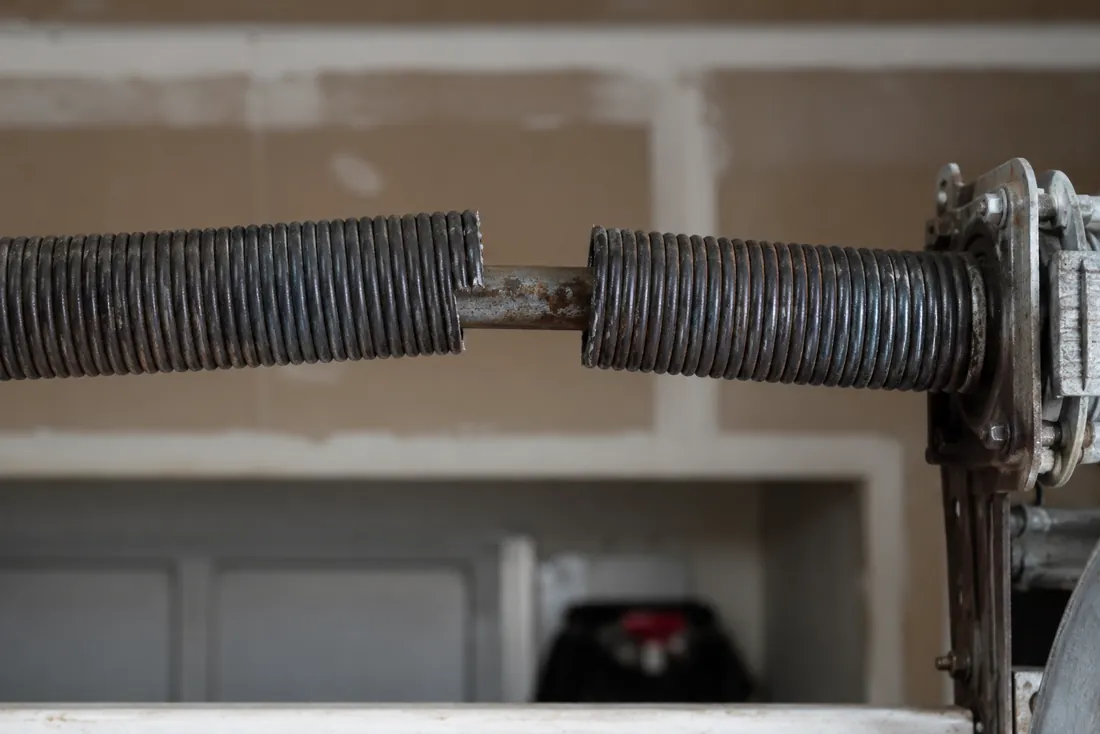
3. Broken torsion or extension spring
⚠ Not a DIY job
Springs counterbalance the entire weight of the door — a wide two-car door can weigh 300–450 lb. They store enormous energy, and the CPSC and DASMA both warn that spring systems must be repaired only by trained professionals. Documented injuries include broken fingers, deep lacerations from spring or cable whip, eye trauma, and crushed hands.
- SymptomsA loud "bang" like a gunshot from the garage; the door won't open, or lifts a few inches and stops; a visible gap in the torsion coil; the door is extremely heavy by hand; the opener strains and reverses.
- What to doStop using the door and don't run the opener. Call a professional. If your door has two springs, replace both even if only one broke (per DASMA).
- Cost (2026)$150–$350 for torsion; $120–$200 for extension; $200–$500 for a complete spring-and-cable system.
- VerdictAlways professional
4. Snapped or frayed lift cables
⚠ Not a DIY job
Cables are under high tension whenever the door is down, and can whip violently if released. DASMA says homeowners may visually inspect for fraying, but worn cables should be replaced professionally.
- SymptomsThe door hangs crooked or jams; a cable dangles loose; you can see frayed or rusted strands; the door dropped suddenly on one side; uneven movement or grinding.
- CostAbout $150–$350 for the pair.
- VerdictAlways professional

5. Door off track (rollers derailed)
- SymptomsThe door is crooked, jammed, or tilted; gaps between the rollers and the track; grinding; it binds partway. Causes range from a vehicle bump and worn rollers to loose track bolts, debris, or — importantly — a broken cable or spring.
- DIY fix (minor derailment only)Stop using the door and disconnect the opener. Secure the door with locking pliers or C-clamps on the tracks, find where the roller jumped out, gently pry the track lip open, guide the roller back in, and tap the track closed with a rubber mallet. Tighten loose bolts, lubricate, and test by hand before re-engaging the opener.
- Stop ifA cable is off the drum, a spring is broken, the track is badly bent, or the door is heavy or unstable.
- CostReset about $170–$290; track replacement $125–$300.
- VerdictDIY for a single minor roller Pro if cables/springs/bent track involved
6. Bent or damaged tracks
- SymptomsVisible bends, dents, or gaps in the track; the door sticks at the same spot every time; rollers rise out where the track is bent.
- DIY fix (light dents only)Disconnect power, check alignment with a level, tap minor dents back with a rubber mallet, tighten the lag bolts and brackets, then clean and lightly lubricate.
- CostAbout $125–$300.
- VerdictDIY for light dents Pro for badly bent track
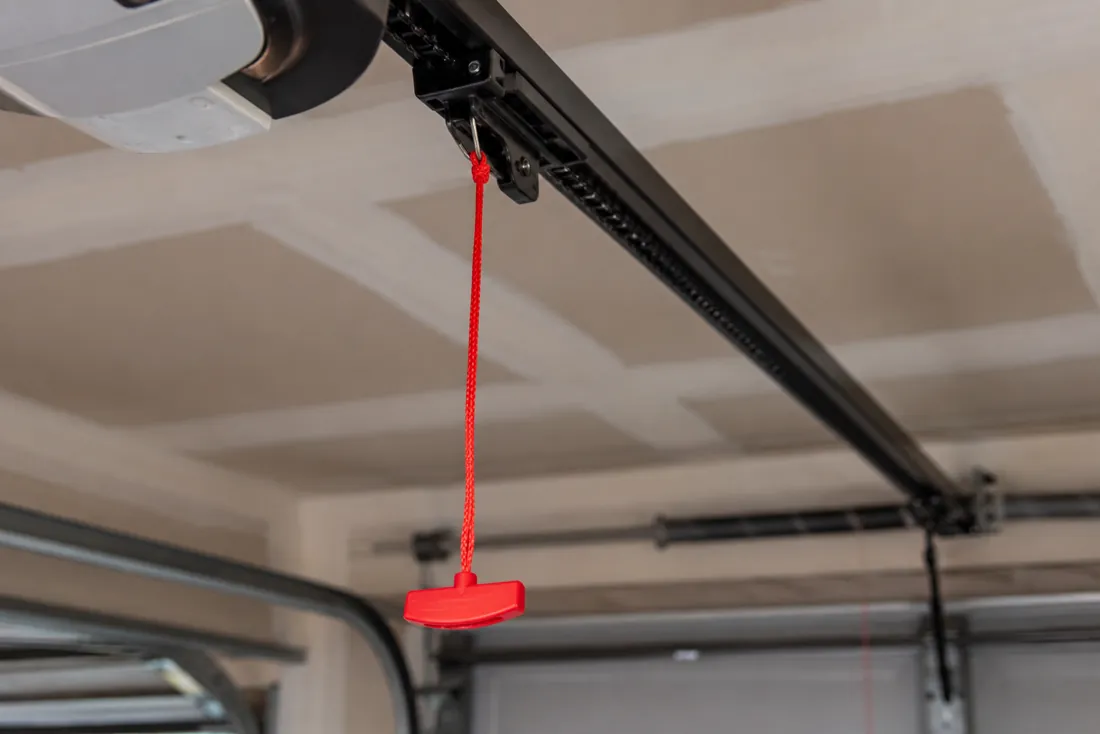
7. Engaged emergency release / disconnected trolley
- SymptomsThe motor runs and the chain or belt moves, but the door stays put; the door opens easily by hand; the red cord hangs lower than usual.
- DIY fixWith the door fully closed, pull the red cord straight down to set the lever, then pull it toward the door to re-engage (you'll hear a click). Run the opener — or slide the door by hand — until it re-latches, then test a full cycle.
- VerdictDIY
8. Motor runs but the door doesn't move
When the motor hums and the light comes on but nothing moves, check the causes in this order: (1) the trolley is disengaged (see #7); (2) a stripped plastic drive gear (grinding sound, white plastic shavings); (3) a broken or derailed chain or belt; (4) a broken spring; (5) a failed logic board.
- DIY fixConfirm the trolley is engaged and the spring isn't broken. For a stripped gear, unplug the unit, remove the cover, and inspect the main plastic drive gear — model-specific gear kits run about $15–$35 in parts. Re-tension or reseat a loose chain or belt per your manual.
- CostGear replacement about $100–$150 professionally; broader opener repairs $100–$400. If the opener is 10–15+ years old, replacement ($300–$900 installed) often makes more sense.
- VerdictDIY for handy owners Pro for motor/logic-board work
Hit a spring, cable, or off-track door?
Those three are the dangerous ones — don't force it. A local technician can usually fix it same-day.
Get a free repair quote9. Incorrect limit / travel-switch settings
- SymptomsThe door reverses just before or after it reaches the floor, stops short, or won't open fully — with no obstruction and the sensors working fine.
- DIY fixOn manual-screw models, turn the UP/DOWN limit screws a little at a time with a flathead, running a full cycle after each tweak. On button models, follow your manual to set the open and close positions. After any limit or force change, test the safety reversal on a 1½-inch object (or a flat 2×4).
- NoteRepeated cycling can overheat the motor — give it about 15 minutes to cool.
- VerdictDIY with the manual Pro if limits won't hold
10. Manual lock engaged (slide lock or "vacation" lock)
There are two different "locks." A mechanical slide or T-handle lock physically bolts the door to the track. A "vacation" or lock button on the wall console electronically disables the remotes.
- SymptomsMechanical — the motor strains or the door won't move, and you can see the bolt engaged. Vacation lock — the wall button works (or the console shows "Lock Mode") but no remote does.
- DIY fixMechanical: unlock the T-handle or bolt before operating. Vacation/electronic: hold the Lock button on the wall console for 2–3 seconds (up to 10) until its LED is steady.
- VerdictFully DIY
11. Power issues — tripped GFCI or unplugged opener
- SymptomsThe opener is completely dead — no lights, no sound — often after a storm, surge, or moisture.
- DIY fixReseat the plug in the ceiling outlet and test that outlet with another device. Reset any tripped breaker, then find and reset the GFCI (it may be in the garage, laundry, or a bathroom). If the GFCI trips again the instant the opener runs, the opener likely has a ground fault.
- Stop ifThe GFCI keeps tripping — that's a real fault for an electrician, not something to defeat.
- VerdictDIY resets Electrician for persistent faults
12. Cold-weather stiffness & lack of lubrication
- SymptomsThe door is sluggish, sticks, or won't move on cold mornings; it's "glued" to the floor by ice; the opener strains.
- DIY fixIf it's frozen to the slab, don't force it — gently chip the ice or warm the bottom seal with a hairdryer or warm (not boiling) water, then dry it. Remove hardened grease with solvent and a stiff brush, then apply a silicone-based lubricant (not WD-40) to hinges, rollers, springs, and bearings. Clear snow, keep the weatherstripping intact, and wipe any fogged sensor lenses.
- Stop ifThe door stays heavy after de-icing — that points to a broken spring.
- VerdictDIY for lube & de-icing
How to open a garage door manually
The red cord hanging from the trolley is the emergency release: pulling it disconnects the door from the opener so it slides freely. The CPSC requires a label near the wall switch explaining how to detach the opener.
From inside
- Make sure the door is fully closed, then unplug the opener.
- Pull the red cord straight down until it clicks.
- Lift the door by hand. It should take moderate effort — if it's very heavy, stop; that's a broken spring or cable.
- To hold it open, clamp the tracks just above the rollers.
From outside
Many garages have an exterior emergency-release kit — a small keyed cylinder near the top center, connected by cable to the trolley release. Insert the key, turn, and pull the cylinder out to disengage the trolley (you'll hear the click). Release any bottom slide lock, then lift by the handle. If your garage has no other entry and no kit installed, that's a strong reason to add one.
✓ Reconnecting
Close the door fully, then pull the red cord toward the door (or push the trolley lever up) until it resets with a click. Run the opener to re-latch, then test a full cycle and re-check the safety reversal.

Typical 2025–2026 repair costs
These are national-average ranges drawn from Angi, HomeAdvisor, HomeGuide, This Old House, and Forbes Home. Real prices vary by region, door size, and any emergency or after-hours premium (often +$100–$200). Always get an itemized quote.
| Repair | Typical range |
|---|---|
| Service call / diagnostic fee | $75–$100 (often credited toward repair) |
| Torsion spring replacement | $150–$350 (replace both) |
| Extension spring replacement | $120–$200 |
| Complete spring + cable system | $200–$500 |
| Cable replacement (pair) | $150–$350 |
| Sensor realignment / replacement | $85–$200 (sensor pair ~$50–$100) |
| Roller replacement | $110–$230 |
| Off-track door reset | $170–$290 |
| Track repair / replacement | $125–$300 |
| Opener gear / sprocket repair | ~$100–$150 |
| Opener repair (general) | $100–$400 |
| Circuit / logic board replacement | $125–$500 |
| Full opener replacement (installed) | $300–$900 (smart $1,000+) |
| Annual tune-up | $100–$200 |
| Full door replacement | $700–$3,500+ |
Brand-specific troubleshooting notes
All four major brands use diagnostic LED blink codes — counting the flashes tells you whether you're looking at a sensor, wiring, or logic-board problem. LiftMaster, Chamberlain, and Craftsman share engineering and codes; Genie's "Safe-T-Beam" system is its own thing.
| Brand | Diagnostic indicator | Sensor LEDs | Lock feature |
|---|---|---|---|
| LiftMaster | Blink codes: 1=sensor wire disconnected, 2=wires reversed/shorted (or lock on), 4=sensors misaligned, 10 flashes=sensors blocked | Sending eye amber; receiving green (solid when aligned) | Hold "Lock" ~2–3 s to toggle vacation lock |
| Chamberlain | Same codes as LiftMaster (same parent company); 10 flashes for blocked/misaligned sensors | Same amber / green | Same Lock toggle; "Lock Mode" on Elite/Estate LCD |
| Craftsman | Built on the Chamberlain/LiftMaster platform — same self-diagnostic blink codes | Same amber / green | Same vacation-lock behavior |
| Genie | Status LED + "Safe-T-Beam" (STB). E.g. 5 blinks = check STB; red 1 blink = unprogrammed remote; solid red = limits not set | Safe-T-Beam: red flashing = malfunction; mount 5–6 in. off the floor, facing each other | — |

When to DIY vs. call a pro
✓ Safe to DIY
Remote and keypad batteries, cleaning and aligning sensors, resetting a GFCI or breaker, reconnecting the trolley, disengaging manual or vacation locks, light lubrication and de-icing, a minor single-roller derailment, travel-limit adjustments, and — for the handy — opener gear or belt swaps.
⚠ Call a professional
Broken or worn springs, snapped or frayed cables, an off-track door involving cables or springs, bent-track replacement, a heavy or unbalanced door, internal motor or logic-board faults, and persistent GFCI ground faults (electrician). The simple test: after disconnecting the opener, if the door won't lift smoothly by hand, it's a spring, cable, or balance problem — professional only.

Frequently asked questions
Why does my garage door open but not close?
It's almost always the photo-eye safety sensors — blocked, dirty, knocked out of alignment, or blinded by direct sun (the opener light often flashes about 10× on LiftMaster and Chamberlain units). Clean both lenses and realign until each LED is steady; if they're fine, check the down-travel limit.
Why does it close partway then reverse?
Either the sensors are reading a real or false obstruction, or the down-travel/force limit is set so the opener thinks the floor is an obstacle. Clean and align the sensors first; otherwise adjust the travel limits and re-test the auto-reverse.
How long do springs and cables last?
Springs are rated by cycles — commonly about 10,000, which is roughly 7–10 years of typical use (high-cycle springs last longer). Cables also last about 7–10 years. Replace both springs, and both cables, together.
Is DIY garage door repair safe?
Many tasks are: batteries, sensors, locks, power resets, lubrication, minor track and roller fixes, and limit adjustments. But spring, cable, and off-track repairs are not — the CPSC and DASMA warn these systems are under extreme tension and must be handled by a professional.
How much does a service call cost?
A standard weekday diagnostic or service-call fee is about $75–$100, often credited toward the repair. Emergency, weekend, or after-hours visits commonly add $100–$200.
The motor runs but the door doesn't move — what's wrong?
In order: the trolley is disengaged (reconnect it), a stripped plastic drive gear (replace the kit), a broken or off chain/belt, or a broken spring making the door too heavy. Stop running the opener once you suspect a broken spring.
My remote stopped working but the wall button still does — why?
Usually a dead remote battery, a transmitter that needs reprogramming, or the vacation/lock feature is engaged (hold the Lock button until the LED is solid). LED bulbs can also cause radio interference.
A note on safety
This guide is general homeowner information, not a substitute for a qualified technician's on-site diagnosis. Cost figures are national-average ranges. Brand blink-code meanings differ by model and year — always verify against your own manual. The moment you see a gapped or broken spring, a loose or frayed cable, a crooked off-track door, or a door that's extremely heavy by hand, stop and call a pro.