The short version
- Garage door remote programming is a five-minute job once you know the sequence: put the opener in learn mode, then press the remote's button inside a 30-second window until the opener's lights flash or you hear two clicks.
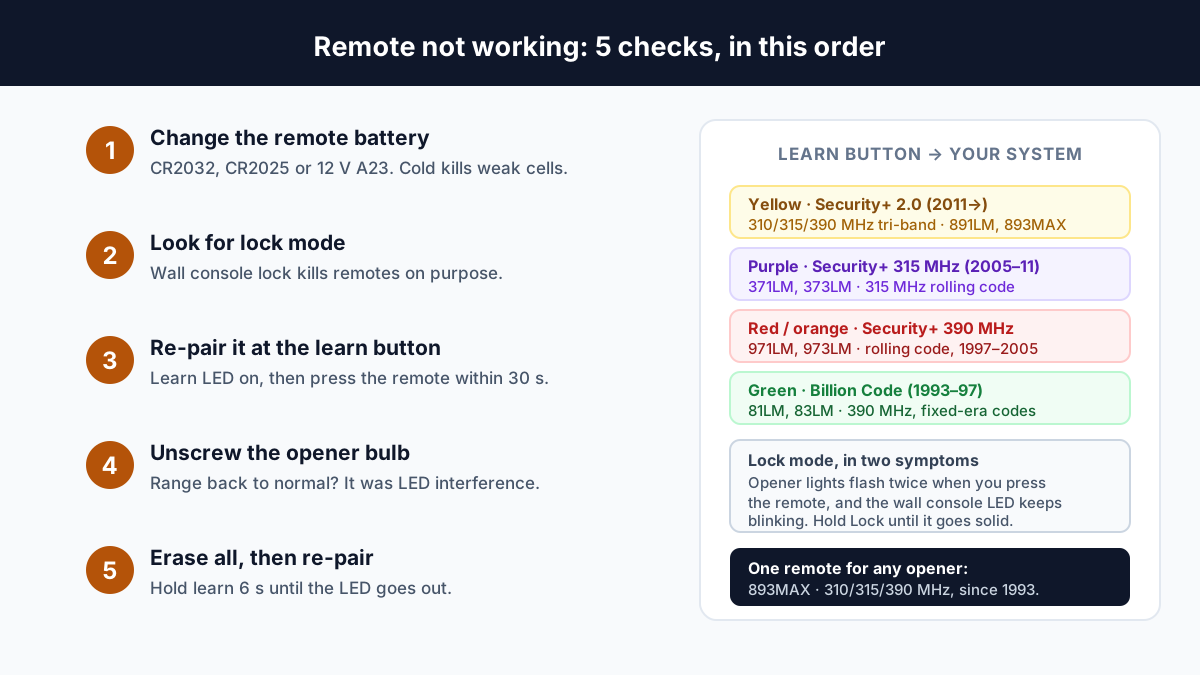
- The learn-button colour decides which remote you can buy. Yellow is Security+ 2.0 (2011–today, tri-band 310/315/390 MHz), purple is Security+ 315 MHz (2005–2011), red or orange is Security+ 390 MHz (1997–2005), green is Billion Code (1993–1997) — and remotes do not cross eras.
- Wall button works, remote doesn't? The fault is on the radio side, in this order: battery → lock mode → pairing → antenna → LED interference → receiver. If the opener lights flash twice when you press, it is lock mode.
- A new LED bulb is the most-missed cause. LED and CFL lamps radiate noise in the 300–400 MHz band that opener remotes use, and the bulb sits inches from the opener's antenna. Range can fall from 30 ft to 1–2 ft. Unscrew the bulb and retest.
- Money: DIY pairing is $0. A replacement remote is $20–$60 (commonly $30–$40), a keypad $40–$60, and professional programming $50–$150 with an average near $90 — normally covered by the service call if a technician is already there.
Garage door remote programming comes down to two presses in the right order: one at the opener to open a short learning window, one on the remote inside it. Everything else in this guide exists because that window is only about 30 seconds long, because the button you press is in a different place on every brand, and because a remote that has worked for years can stop for reasons that have nothing to do with the remote.
So this page does both jobs. First the pairing steps — LiftMaster, Chamberlain, Craftsman and Genie — with the sequence written out as you would actually perform it. Then the diagnostic order for a remote that has quit: battery, lock mode, pairing, antenna, LED bulb interference, and finally the opener's memory. The parts involved cost under $25 and most of the repairs take ten minutes; the two things that are genuinely worth a technician's visit are a failed receiver and a door that no longer balances.
Garage door remote programming: the four ways to pair
There are four supported ways to program a handheld remote to a LiftMaster or Chamberlain opener, and the learn button on the opener itself is the one that works on every compatible model. The other three are time-savers when your hardware supports them: the wall control's learn button, an LCD control panel with a menu, and the myQ app on a Wi-Fi opener. Genie uses the same two-part logic with different hardware names, covered further down.
| Method | Use it when | What you do |
|---|---|---|
| Learn button on the opener | Any compatible opener. The default choice when you don't know the model. | Press and immediately release the learn button on the motor head (you'll need a ladder). The learn LED glows steadily. Within 30 seconds press and hold the remote's button until the opener lights flash or you hear two clicks. |
| Learn button on the wall control | The wall control has a learn button — no ladder needed. | Press and release the wall control's learn button twice. The LED begins blinking. Within 30 seconds press and hold the remote's button. |
| LCD smart control panel | Your wall control has a screen or a MENU button. | Scroll to PROGRAM → REMOTE, then press and hold the remote's button until the opener lights flash or you hear two clicks. |
| myQ app | The opener has built-in Wi-Fi — a yellow or white learn button, or a Wi-Fi / "Powered by myQ" logo. | App → Settings (gear) → Devices → Add a New Device → Accessory → Garage Door Remote → choose the opener → scan the remote's QR code or pick the remote type → follow the prompts. |
Four details decide whether the first attempt works. The window is about 30 seconds, so have the remote in your hand before you press learn. On openers that use a learn LED, wait for it to go off before trying again — pressing learn twice in a row into a lit LED is the most common failed attempt. Keep the door area clear and stay in sight of the opener, because the door can move during programming. And check the remote is actually compatible before you blame your technique: a Security+ 2.0 remote will never program to a 2005-era opener, no matter how many times you try.
💡 Programming does not erase anything
Pairing a new remote adds a code — it does not knock the old ones off. Add as many as the opener's memory allows and keep the spares. What wipes codes is a deliberate erase (holding learn for about six seconds) or a failed receiver board, never a flat battery or an outage.
Program it in five minutes
The whole job is three steps: identify the learn button, put the opener into learn mode, and press the remote's button inside the window. Do it once and you can pair every remote, keypad and car button in the household in the same session.
1. Identify your opener's learn button and system
Find the learn button — on the motor head it is usually behind the light lens or on the back panel; on LiftMaster and Chamberlain wall consoles it sits under a small hinged cover — and note its colour, because the colour is the compatibility key for everything else on this page. Genie units instead have a square PROGRAM/PRGM SET button on openers from about 2011, or a round LEARN CODE button on 1995–2011 models.
2. Put the opener into learn mode
- LiftMaster / Chamberlain openerPress and immediately release the learn button. The learn LED glows steadily for about 30 seconds.
- LiftMaster / Chamberlain wall controlPress and release the learn button twice. The LED begins blinking.
- Genie, 2011 and later (PRGM SET)Press and hold the program button until the round LED turns blue, then release. The small LED goes out and the long LED flashes purple.
- Genie, 1995–2011 (LEARN CODE)Press and release once. The red LED begins to flash.
3. Press the remote's button inside the 30-second window
- LiftMaster / ChamberlainPress and hold the remote's button until the opener's lights flash or you hear two clicks. Done — the remote is paired.
- GenieStand at least 5 ft back from the motor head and press and release the remote's button twice, about two seconds apart, until the opener operates. Then press the same button a third time to open or close the door. If the LEDs do not go off, keep pressing a few more times — presses that are too quick or too light are the usual cause.
- A 3-button remoteRepeat for each button on each opener. One button controls one door, so a three-button remote can run up to three doors, or two doors plus a myQ light accessory.
The two-press failure
If programming fails two or three times, stop pressing and check the boring things: the battery is in the right way round and fresh, the remote matches the learn-button colour, and the learn LED had gone out before you pressed learn again. On a Genie, walk back to the 5 ft mark — programming with your hand on the motor head is one of the most common reasons a paired remote "doesn't work".
Brand notes: LiftMaster, Chamberlain, Genie, Craftsman
Chamberlain builds LiftMaster and older Craftsman openers, so those three share one system and the same remotes — and Genie is the one genuinely different family in the garage. That single fact resolves most confusion about "which remote do I need": if the opener says LiftMaster, Chamberlain, Craftsman, Raynor, AccessMaster or Master Mechanic, you are choosing between Security+ 2.0, Security+ 315 MHz, Security+ 390 MHz and Billion Code. If it says Genie, you are choosing between IntelliCode 2 and IntelliCode 1.
- LiftMaster and ChamberlainOne family since the 1990s. Remotes carry model numbers ending in LM (891LM, 971LM, 371LM) with an era-specific frequency, or MAX (893MAX, 890MAX) for the universal tri-band line. The 893MAX is also the answer when you have no working remote left at all, because it programs at the opener rather than learning from another remote.
- CraftsmanBuilt by Chamberlain Group, so it follows the same learn-button colours and takes the same remotes. Garage-door people treat a Craftsman opener as a Chamberlain with a different badge.
- GenieIntelliCode rolling code arrived in 1995, which makes it the older of the two mainstream security systems. The current 3-button remote (G3BT-R / G3T-R class) controls up to three Genie openers, fits openers made since 1996, and runs on a CR2032. Remotes default to IntelliCode 2; for a pre-IntelliCode-2 opener you switch the remote first — press and hold an unused button for 10 seconds until both LEDs stay on, then press it twice to toggle (red LED = IntelliCode 1, green = IntelliCode 2) — and only then put the opener in learn mode.
- Openers made 1995–1997Genie units from that window program from the two upper buttons of the remote only. After 1997 any button works.
- Anything elseLinear, Sommer, Marantec, Ryobi, Xtreme Garage and Moore-O-Matic all appear in the Chamberlain compatibility tool, which is the fastest way to confirm a specific remote part number against a specific opener.
Which remote fits your opener
Match the remote to the learn-button colour and you cannot go wrong: yellow is Security+ 2.0, purple is Security+ 315 MHz, red or orange is Security+ 390 MHz, green is Billion Code. Everything else — 1-button or 3-button, visor clip or keychain — is preference.
| Learn button | System and years | Frequency | Remotes that fit | Typical price |
|---|---|---|---|---|
| Yellow | Security+ 2.0, 2011 → today | 310 / 315 / 390 MHz tri-band | 891LM, 892LT, 893LM, 893MAX, 894LT; keypad 877LM or 877MAX | $15–$40 |
| Purple | Security+ 315 MHz, about 2005–2011 | 315 MHz | 371LM (1-button), 373LM (3-button) | $15–$35 |
| Red / orange | Security+ 390 MHz, about 1997–2005 | 390 MHz | 971LM, 973LM | $20–$40 |
| Green | Billion Code, about 1993–1997 | 390 MHz | 81LM, 83LM (discontinued; the 893MAX replaces them) | $20–$40 |
| Any of the four | Universal, all eras since 1993 | 310 / 315 / 390 MHz | 893MAX (3-button), 890MAX (keychain) | $14–$40 |
The 893MAX is the one part worth knowing by name. It is tri-band across 310, 315 and 390 MHz, compatible with every LiftMaster opener manufactured since January 1993, and it covers green, orange/red, purple and yellow learn buttons in a single unit — three buttons, up to three doors or myQ light accessories, one-year accessory warranty, $39.99 list. In practice it sells for around $18, and generic equivalent three-button packs are under $15 for two, which is why "which remote?" stops being a research project once you own one.
⚠ The expensive mistake
Buying a remote for the wrong era. An 891LM will not work on a purple-button opener, and an older Security+ remote will not operate a Security+ 2.0 opener — the newer system does not recognise the older rolling-code format, so there is nothing to program. Read the learn button before you order, not after.
Remote not working? Diagnose it in order
When the wall button works and the remote does not, the fault is in the radio path, and the order that finds it fastest is battery, lock mode, pairing, antenna, interference, receiver. Resist the urge to buy a new remote first — in most households the door is fixed by a two-dollar coin cell or a wall console button nobody remembers pressing.
Test a second control before you buy anything
Two quick presses tell you which half of the system is broken. Press the wall console button: if the door moves, power, logic board and travel limits are all fine and the problem is the radio. Then press a second remote if you have one: if the spare works, replace the first remote; if the spare is also dead, stop shopping and work through the opener side of the list below.
- Remote batteryMost visor remotes use a CR2032 coin cell; slim or older units use CR2025 / CR2016 (2.5 mm against 3.2 mm — a 2025 in a 2032 slot sits loose and works intermittently); older 3-button LiftMaster, Chamberlain, Linear, Marantec and Genie bullet remotes use a 12 V A23. Expect one to two years, and expect failure in the first cold snap, because cold halves the output of a cell that was already marginal. If a "dead" remote has corrosion on the contacts, clean it with a pencil eraser. The full opener battery guide covers every battery in the system, including the keypad's 9 V and the myQ sensor's CR2450.
- Lock mode (vacation mode)On purpose, the opener ignores every remote. The published symptoms are exact: the opener lights flash twice when you press a remote button, and the command LED on the wall control flashes continuously. Fix: hold the Lock button on the wall control until the indicator stops flashing or goes solid, then test. If you are locked out of the garage, you need another door into the house to reach the console.
- PairingSuspect a lost pairing after any repair, a board replacement, or if someone held the learn button. Re-pair with the steps above; if it refuses, go to clearing the memory.
- AntennaThe antenna is the thin wire hanging from the motor head. It must hang straight down and extended, not coiled, kinked, cut or tucked back inside the housing. A coiled antenna is a classic cause of "it only works up close".
- InterferenceCovered fully in the next section — and the single most under-diagnosed cause of a remote that works at 3 ft and not at 30.
- Receiver or logic boardA failed receiver module kills the remotes while leaving the hardwired wall console working, because the console is a separate low-voltage path. That is a board diagnosis: $120–$220 on mainstream models. A surge protector rated 1,000 joules or more costs $15–$40 and is the cheap insurance.
LED bulbs and RF interference: the 30 ft that became 2 ft
If your remote suddenly only works from a few feet away, suspect the light bulb in the opener. LED and CFL lamps contain switching power supplies — electronic ballasts in CFLs, driver circuits in LEDs — that radiate broadband radio noise, and a large part of that noise lands in the 300–400 MHz band where residential opener remotes work. The bulb sits inches from the opener's antenna, so at any real distance the noise drowns the remote's signal. Reported effect: usable range falling from about 30 ft to 1–2 ft, to the point where a new remote or keypad cannot be programmed at all.
Rule out lock mode, a weak battery and LED interference
The manufacturer's own symptom list for bulb interference is worth memorising, because it reads like three unrelated faults: the remote only works when it is close to the opener; the remote closes the door but will not open it (or the reverse); a new remote or keypad cannot be programmed at all. The 60-second test is a bulb swap — stand at your normal parking spot and press the remote, then unscrew the opener's bulb(s) and press again from the same spot. Range restored means the bulb was the problem, not the remote.
| Fix | Cost | Notes |
|---|---|---|
| Opener-rated shielded LED | $15–$25 | LiftMaster / Chamberlain 41A5034, CHLED1 or LMLED1 (800 lm, the equivalent of a 60 W incandescent, weather-tested to −30 °F, shatter-resistant), or Genie 38475R. Engineered not to emit in the remote band and built to survive opener vibration — the only permanent fix. |
| Rough-service incandescent | $2–$5 | No switching electronics, so no RFI by construction. Must be a vibration-rated lamp within the socket's labelled wattage. Hot, short-lived, increasingly hard to find. |
| Ferrite cores on the fixture cord | $5–$15 | For interference from a fixture rather than the opener socket — snap a core around the cord of an LED shop light and loop the cord through twice. Cheap, invisible, and effective when the source is a shop light. |
| Find the real source | $0 | Turn circuits off one at a time at the breaker while pressing the remote from the driveway. Anything with a switching supply can be at fault: LED shop lights and pot lights, aftermarket car interior LEDs, EV chargers and their power supplies, Wi-Fi routers, smart hubs, cameras, baby monitors and cell boosters. |
Interference also explains the maddening timing cases. A remote that works at noon and fails at 11 p.m. is usually not your hardware at all — it is a neighbour's LED floodlight, security camera or EV charger that has come on. A remote that works from inside the garage and not from the driveway is a range problem, not a pairing problem. Both are the same diagnostic: eliminate sources while watching the range, and start with the bulb that is 6 in from the antenna.
💡 Check the antenna too
While you are up there with the lens off, look at the antenna wire. If it has been coiled up around the housing during a previous repair, straighten it and let it hang down. Free, and occasionally the whole fix.
Keypads, cars and HomeLink
A garage door keypad is programmed in two stages — the keypad is told which opener family it is talking to, then the opener is told your PIN — and doing it in one rushed sequence is why so many keypads end up not working. The keypad side first: hold * and # together until the lights stop blinking, enter your 4-digit PIN, press #, then press ENTER once for a yellow learn button (Security+ 2.0), twice for purple (315 MHz), three times for red/orange (390 MHz) or four times for green (Billion Code), then press 0 to finish. Only then press and release the opener's learn button and, within 30 seconds, enter the PIN and press ENTER until the opener lights flash or you hear two clicks.
Two keys to know. The 877MAX has no ENTER key — you enter the PIN and hold the up-arrow (or the lock icon) for about three seconds; two flashes means saved, one blink means the press registered but the save did not. And a keypad is battery-powered like a remote: most run on a 9 V (877MAX) or AAA, and a fading battery is why a keypad works up close but not from the driveway. Changing a PIN you know needs no learn button at all; a forgotten PIN means erasing the opener's memory and re-pairing everything. Keypads themselves are $40–$60 and fit in about ten minutes with a screwdriver.
Cars are a separate problem. A vehicle built before roughly 2012 often has a fixed-frequency or single-frequency HomeLink transmitter that cannot talk to a Security+ 2.0 opener, no matter what you do at the learn button. The fix is a HomeLink compatibility bridge (a repeater that learns the opener and re-transmits to the car), or a visor remote clipped to the sun visor. If the car button stopped working after a change at the opener, re-learn the car button against the opener in learn mode; if it still will not hold, the car's transmitter, not the door, is the part to suspect.
Clearing the memory and re-pairing every remote
When a remote simply will not program, clear the opener's memory and pair everything fresh — it takes ten minutes and removes every lingering doubt about which code the board is holding. It is also the right response to a lost remote, a keypad you did not program, or moving into a house whose opener you did not set up: an erased board means nobody else's old remote opens your door.
Erase the opener's memory and re-pair every remote
- LiftMaster / ChamberlainPress and hold the learn button until the LED turns off, about six seconds. All previous codes are erased. (On myQ control-panel models, use that panel's learn button the same way.)
- Genie, PRGM SET modelsPress and hold the program button until the round LED turns blue, then press and hold UP(+) and DOWN(−) together until both LEDs flash blue and go out.
- Genie, LEARN CODE modelsPress and hold the learn code button until the LED stops blinking.
- Then re-pair everythingEvery remote, both keypads, the car buttons and the myQ accessories — one device at a time, each in its own learn window.
- What does not erase codesA flat remote battery, a power cut or even a long vacation with the opener unplugged. The manufacturer's own documentation is explicit that programming is not erased by an extended outage, so an old code stays until you deliberately hold the learn button.
What remotes and programming cost
Programming a remote yourself is free; buying the remote is the only real cost, at $20–$60 for most models. The paid line in the table exists only when a remote refuses to program, the receiver is suspect, or a technician is already on site for something else.
| Item | Typical cost | Notes |
|---|---|---|
| Single OEM remote (e.g. LiftMaster 893MAX) | $39.99 list, $15–$25 street | Tri-band, fits every LiftMaster opener since 1993. Generic equivalent 2-packs run under $15. |
| Basic / universal remote | $20–$60 (most $30–$40) | 1-button, 2-button and 3-button visor remotes across all four learn-button eras. |
| Extra remote for the same household | $15–$30 each | Pairing is free and instant once you are in learn mode. |
| Smart or Wi-Fi remote and hub | $60–$180 | App control, schedules and delivery openers — a hub, not a handheld remote. |
| Wireless keypad | $40–$60 | Universal keypads cover most brands via a colour-code setup; 10-minute DIY install. |
| Professional programming / pairing | $50–$150 (avg ~$90) | Usually folded into the $50–$100 service-call fee, so it is free if the technician is already at the house. |
| Receiver or logic board, if that is the fault | $120–$220 | Opener repairs generally run $100–$200. Compare against the repair-or-replace maths in the opener lifespan guide. |
| New opener installed (context) | $300–$900, typical $250–$550 | National average around $329. Never replace an opener over a $20 remote. |
Rolling codes and old openers
Modern remotes send a different code on every press; fixed-code remotes from before the 1990s sent the same code every time — and that difference is the reason to re-pair rather than hunt for a lost remote. The progression is: fixed-code and DIP-switch remotes (pre-1993 style, and Billion Code on the green learn button), then Security+ rolling code at 390 MHz (about 1997–2005), then 315 MHz (about 2005–2011), then encrypted tri-band Security+ 2.0 from 2011. Genie's IntelliCode rolling code arrived in 1995 and is now on its second generation.
Two practical consequences. First, a fixed-code opener on an attached garage is a door that broadcasts its own key — a captured or matched code opens it, and no amount of re-pairing changes that. Second, when a remote or keypad goes missing, the correct response is erase all and re-pair, not "leave it, it will probably turn up": that one press of the learn button invalidates the lost remote while keeping the ones you have.
Safety is a separate axis from radio security. UL 325 and its federal counterpart 16 CFR Part 1211 govern entrapment protection — the internal auto-reverse plus photo-eyes mounted no more than 6 in above the floor — and they have applied to openers manufactured on or after 1 January 1993. A remote fault is never a reason to defeat the sensors. That said, if you are holding a fixed-code opener with no photo-eyes, the programming question is moot: the unit predates the requirement and belongs in the replace-on-age column, not the repair column. Coin cells — CR2032, CR2025, CR2016, CR2450 — are also a serious swallowing hazard for children; store spares out of reach.
Remote still dead after a fresh battery and a re-pair?
A technician can test the remote's signal, check the receiver and antenna, clear the opener's memory and re-program every remote, keypad and car button on the same visit — and tell you straight whether a $20 remote or a board is the honest answer.
Request ServiceWhen to call a professional
Batteries, learn buttons, pairings, PINs, car buttons, antenna wires and new LED lamps are all homeowner work, and the whole list costs less than a service call. These are not:
- Neither the remote nor the wall console moves the door. That is power or a logic board, not a pairing problem — see the opener not working guide for the whole diagnosis.
- Remotes die one after another, or a remote that was just programmed stops working the same day. Something is erasing or ignoring codes: the board, a failing receiver, or a control panel fault.
- The door is heavy, slams, or drifts, or it opens and closes on its own. Springs, balance and control-station faults are professional work, and a door fighting a bad spring takes the opener with it.
- The opener has no photo-eyes, or one sensor will not hold a solid LED. That is a safety decision rather than a radio one, and it is not solved by more programming.
- You want every device in the house re-paired at once after a board change — three remotes, two keypads and two cars is a job worth one visit rather than an afternoon on a ladder.
One last scope note: this page is about the controls, not the door. If the remote works perfectly and the door still misbehaves on its way up or down, you are looking at a mechanical fault — the won't open or close guide covers the twelve usual causes, and the annual tune-up checklist covers what a service visit should include.
Frequently asked questions
How do I program my garage door remote?
Press the learn button on the garage door opener to put it into learn mode - the learn LED glows steadily - then press and hold the remote's button within about 30 seconds. The opener's lights flash or you hear two clicks when the code is accepted. If your wall control has a learn button you can use that instead: press and release it twice so the LED blinks, then press and hold the remote button. Genie openers take the same two-part sequence but with a PROGRAM/PRGM SET or LEARN CODE button, and you press the remote button twice rather than holding it.
How long does it take to program a garage door remote?
About five minutes from standing in the garage to a working remote, and that includes fetching a ladder if the learn button is on the motor head. Most of the time is getting the opener into learn mode; the actual pairing press takes seconds. The one hard limit is the 30-second pairing window, which is why you should have the remote in your hand before you press learn.
Why is my garage door remote not working but the wall button works?
Because the wall console is wired to the opener and the remote is a radio, so the fault is in the radio path: a weak remote battery, lock or vacation mode enabled on the wall control, a lost pairing, an antenna wire that is coiled or tucked into the housing, LED bulb interference, or a failed receiver board. Work through them in that order - battery first, then lock mode, then re-pairing, then interference. If the opener lights flash twice when you press the remote, it is almost certainly lock mode.
Why did my garage door remote stop working all of a sudden?
The usual culprits are a remote battery that has finally gone flat (often in the first cold snap, because cold halves the voltage of a marginal coin cell), someone pressing the lock button on the wall console, a new LED light bulb in the opener socket, or the opener's memory being cleared during repair work. A remote that works only from a few feet away, or only in the afternoon, points at interference rather than a dead remote - LED bulbs, LED shop lights, a neighbour's camera or charger.
How do I know which garage door remote to buy?
Read your opener's learn button colour: yellow is Security+ 2.0 (2011 to today, 310/315/390 MHz tri-band, remotes such as the 891LM or 893MAX), purple is Security+ 315 MHz (about 2005-2011, 371LM or 373LM), red or orange is Security+ 390 MHz (about 1997-2005, 971LM or 973LM) and green is Billion Code (about 1993-1997, 81LM). Remotes do not cross eras: an 891LM will not work on a purple-button opener and an older Security+ remote will not operate a Security+ 2.0 opener. The 893MAX is the universal answer - it covers all four, and every LiftMaster opener made since January 1993.
Does a dead remote battery cause the opener to lose the remote's code?
No. The pairing lives in the opener's memory, not in the remote, and it survives a flat battery, a power cut and even an extended outage - LiftMaster's own documentation notes that programming is not erased when the opener is unplugged for a long period. Fit a new battery and the same remote should work immediately. The codes are only lost when someone deliberately erases the opener's memory or the board fails.
How much does it cost to program or replace a garage door remote?
DIY programming is free and takes about five minutes. A replacement remote runs $20-$60 for most single or multi-button models, with the common ones around $30-$40 - a LiftMaster 893MAX lists at $39.99 and is often $15-$25 in stores; extra remotes are $15-$30 each, and smart or Wi-Fi remotes and hubs $60-$180. If you would rather not do it, professional programming or pairing is $50-$150 with an average around $90, usually absorbed into the service-call fee if a technician is already at the house.
A note on scope
This is general homeowner guidance, not a substitute for a technician's on-site assessment. Programming sequences are the manufacturers' published methods and differ by model — always follow your own opener's manual, and note that learn-button colour conventions are Chamberlain Group's, not a standard. Costs are national-average 2025–2026 ranges from published trade and consumer pricing and vary with region, brand and access; retail prices were sampled in September 2026 and move with promotions. Compatibility claims are based on the manufacturers' own compatibility tools and trade documentation, not on independent testing. Erase-all procedures wipe every remote and keypad from the opener's memory, so have each device in hand before you start. Work with the door area clear, keep children and pets away from a door that may move during programming, and leave spring, cable, bottom-bracket, mains-voltage and logic-board work to a qualified technician.