The short version
- A sectional door has four seals, not one. Garage door weather stripping installation is almost always about the bottom seal — the rubber strip that slides into the aluminium retainer on the lowest section — and that is the seal that fails first.
- Find the leak with the daylight test. Close the door, turn the lights off inside, and look for light under the door and along the jambs. No light, no leak.
- Measure before you buy. The T stem is 1/4 in on most doors and 5/16 in on some — they do not interchange. Standard width is 3–4 in flat; go to 5–6 in for a sloping floor or a gap over 1/2 in.
- Cost: $15–$30 in parts and an afternoon for a DIY bottom seal; $45–$100 installed on a single door; $150–$300 for a professional bottom seal plus threshold.
- Expect 3–7 years from a bottom seal, 10–15 from the perimeter seals. Freeze-thaw, sun and road salt are what kill them.
Garage door weather stripping installation is mostly one job — sliding a new rubber seal into the aluminium retainer along the bottom edge of the door — but the diagnosis is what decides whether the job works. A sectional door has four separate seals, and the draft, the puddle or the mouse is only sometimes coming from the bottom one. This guide covers all four, how to test which has failed, how to measure the parts so you buy the right ones the first time, the full installation walk-through, and what the work costs in 2025–2026.
The four seals on a garage door — and which one is leaking
A garage door seals in four places, and the seal people mean when they say "weather stripping" is usually the bottom one, because it does the most work and wears out first.
| Seal | Where it goes | What it stops | Service life |
|---|---|---|---|
| Bottom seal (astragal) | Slides into the retainer channel on the lowest section | The floor gap: water, drafts, insects, leaves, the biggest single leak path | 3–7 years — less in hard winters |
| Perimeter seal (stop molding, jamb seal) | Nailed to the frame down both sides and across the top header | The gap between the door face and the framing: wind, dust, insects, driven rain | 10–15 years |
| Section-joint seals | Between the horizontal panels | Drafts and daylight between sections on older or single-layer doors | With the door |
| Threshold seal | Glued to the concrete floor, not the door | Low spots, sloped floors and water running in under the door | 5–10 years with traffic |
Two things worth knowing before you buy anything. First, the bottom seal is the one that takes daily compression against concrete, sun and grit, which is why it is the seal that is almost always finished on a door over six years old — while the side and top seals on the same door may still be perfectly serviceable. Second, seals reduce drafts, daylight, dust and ordinary rain splash; they do not turn a sectional door into a waterproof wall. Match the seal to the leak you actually have: a new bottom seal does nothing about a top fixture that sits too far off the header.
Look at the bottom 12–18 inches, inside and out
The lowest panel and the seal under it take everything: road salt, driveway splash, standing water, snowmelt and the sun. Wipe the inside face of the bottom section down once a year too — grit and salt residue collect there and eat the door and the seal from behind. If you are already seeing rust above the bottom edge, our rust removal and prevention guide covers that failure and the 30-second test that separates surface rust from rust-through.
The daylight test: which seal has failed
Close the door, stand inside with the lights off, and look for daylight. Light under the bottom edge or along the jambs is air, water and pests getting in, and it is the fastest diagnosis there is — no tools, no guesswork.
| What you see or feel | Most likely cause | The fix |
|---|---|---|
| Daylight under the closed door; leaves and insects on the floor inside | Bottom seal flattened, cracked or missing | Replace the bottom seal |
| Water staining on the concrete just inside the door after rain | Bottom seal, or a low spot / inward-sloping driveway | Bottom seal first, threshold seal if the floor is the problem |
| Cold air at floor level in winter, felt by hand | Bottom seal no longer compressing against the slab | Replace the bottom seal; check the door closes fully |
| Wind whistling, light down the sides or across the top | Perimeter (stop molding) seal gone or compressed | Replace the side and top seals |
| Seal feels brittle, cracked or does not spring back when pressed | UV and cold aging; the rubber has lost its elasticity | Replace — a hardened seal cannot seal |
| Daylight between the panels, not at the edges | Section-joint seals or a damaged tongue-and-groove edge | Panel joint seal, or panel assessment |
| The opener strains or the door drags on the floor | A failed seal forcing the motor against extra resistance | Replace the seal, then reset the opener limits |
| Door did not open on a freezing morning | Ice bonding: meltwater refroze under the seal | Free it safely, then dry, lubricate and seal |
Run the test at the bottom, the two jambs and the top header separately — it is common for the bottom seal to be finished while the perimeter seals are still fine, and the reverse also happens on a door with a misaligned frame. A smoke pen or a stick of incense held along the closed door confirms airflow anywhere you are unsure.
Garage door weather stripping installation, step by step
Replacing the bottom seal is an hour's work with a screwdriver, a utility knife and a spray bottle of soapy water. Buy the new seal before you remove the old one — matching the profile is easier while the old seal is still in your hand.
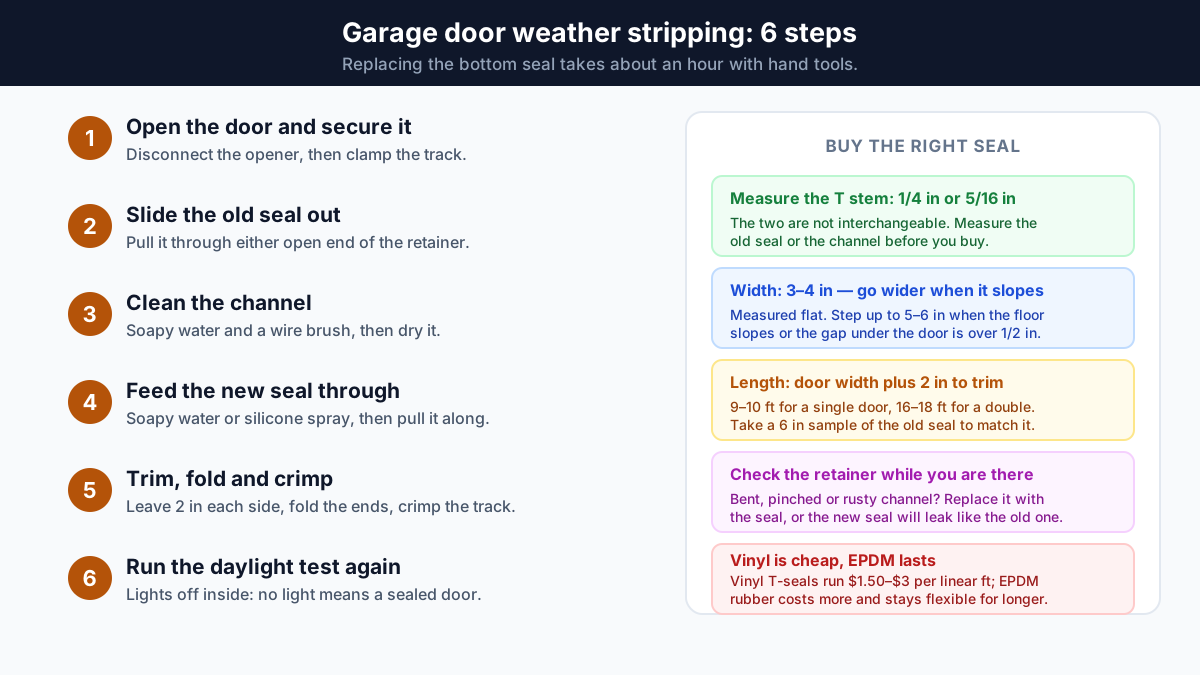
1. Open the door and secure it
Raise the door to chest height, or fully open, so the bottom edge is comfortable to reach. Disconnect the opener so it cannot cycle while you are working, and clamp locking pliers or vice grips onto the track so the door cannot move. This is the one safety step people skip; the bottom section is the lightest part of the door, but it is still under spring tension through the cables.
2. Slide the old seal out of the retainer
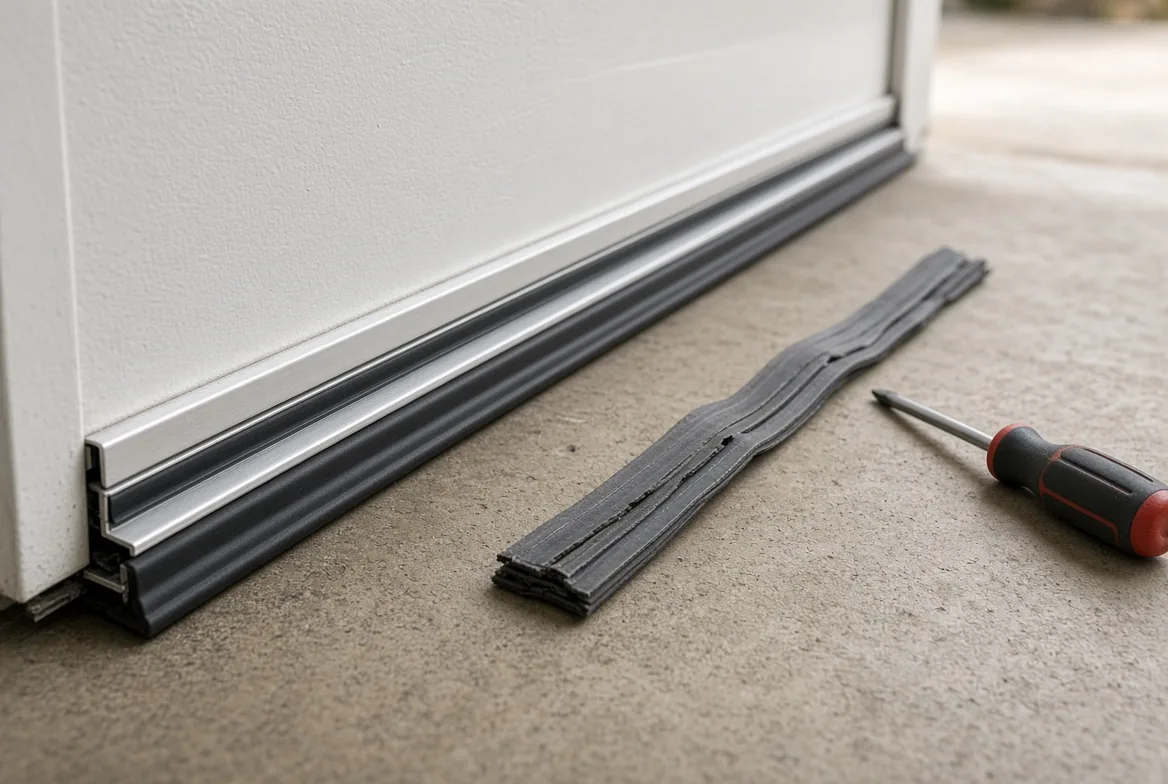
Look at the bottom edge of the door: you will see a metal channel — the retainer — that the seal slides inside. Some retainers have end caps, others are open at one or both ends. Pull the old vinyl or rubber seal out through an open end. If it is stubborn, work it gently; a seal that shreds inside the channel means you will be picking fragments out of the retainer afterwards.
3. Clean the retainer channel
Scrub the channel out with soapy water and a wire brush, then dry it. Dirt, grit and light rust in the channel stop the new seal seating properly, and a channel that is packed solid will not let the seal slide at all. While you are there, check the retainer itself: if it is bent, pinched, corroded or painted shut, replace the retainer along with the seal — a new seal in a crushed channel seals about as well as the old one did.
4. Lubricate and feed the new seal through
Spray the new seal with soapy water or silicone lubricant. Align the T-rails on the new seal with the slots in the channel at one end, push the tip in, then pull it through the full width of the door. Expect to go back and forth a few times on a double door; the lubricant is what keeps the seal from bunching or twisting on the way through.
5. Trim, fold and crimp the ends
Cut the seal leaving about two inches over on each side, fold the cut ends inward into the channel, and crimp the track ends with pliers. The fold-and-crimp is what stops the seal walking sideways out of the retainer over a few hundred cycles — it is a two-minute step that saves you doing this job again in a year.
6. Close the door and run the daylight test
Close the door, stand inside with the lights off and check for daylight under the seal and around the jambs. Then cycle the door with the opener and reset its travel and close-force limits if the seal has changed the closing pressure. Never leave an opener set to force the door past a seal — it wears the opener and defeats the safety reverse. If you want the whole door serviced at the same time, our annual tune-up checklist covers the rest of it.
Installing the perimeter and threshold seals
The perimeter seals follow the same logic with different fasteners: pry off the old molding, scrape away old caulk and nails, measure the jamb height and header width, cut the new strip, and position it with the door closed so the flexible flap flattens slightly against the outside face of the door rather than being squashed against it. Fasten every 6–12 inches with galvanised or stainless fasteners, then caulk the end gaps and re-run the daylight test from inside. Threshold seals are dry-fitted with the door closed to centre the strip on the door line, then bedded into the supplied adhesive on a clean, degreased and fully dry slab, and left to cure before a car drives over them.
Bottom seal sizes: T-stem, width and length
The single most common DIY mistake is buying the wrong profile. Match three numbers before you order: the T stem, the width and the length.
| Profile | End shape | Fits | Found on |
|---|---|---|---|
| T-end / T-style | A T on each end, 1/4 in stem on most brands, 5/16 in on some | Double-channel aluminium retainer | The industry default — most steel doors built since the 1990s |
| Bead-end | A round bead on each end, about 3/8 in | Double-channel retainer with round grooves | Some steel and older doors; regional |
| Bulb | One large round tube with a single flat tail | Single-channel retainer | Older steel doors, some wood doors |
| U-shape / shoehorn | Rubber U that wraps the bottom edge | No retainer — nail-on flap | Older wood doors and pre-retainer doors |
- T stem: 1/4 in or 5/16 in, and they are not interchangeable — a 5/16 seal will not go into a 1/4 retainer, and a 1/4 seal will drop straight out of a 5/16 one. Measure the stem on the old seal, or the channel opening on the retainer.
- Width: 3–4 in measured flat is standard. Step up to 5 or 6 in when the floor slopes or the gap under the door is over 1/2 in. Wider is not automatically better: an oversized seal can drag, bunch and interfere with the opener's closing force.
- Length: door width plus a couple of inches to trim — about 9–10 ft for a single door, 16–18 ft for a double.
- Brand differences are real: Clopay, Wayne Dalton and Amarr use slightly different channel sizes. Cut a 6-inch sample off the old seal and take it with you — it is the fastest way to get the right part.
| Material | Price | Trade-off |
|---|---|---|
| Vinyl / PVC (the common one) | ~$1.50–$3.00 per linear ft | Cheapest and more mould-resistant than rubber, but hardens and cracks faster under UV and cold |
| Rubber / EPDM | ~$2.50–$4.00 per linear ft (bulb) | Costs more, stays flexible far longer; EPDM is the cold-climate choice, rated flexible to about −40 °F |
| Silicone | Premium | Best compression recovery — it returns to shape after being squeezed under the door |
| Brush seals | Varies | Bristles sweep the floor or panel: the fix for uneven floors and doors that sit flush with siding |
Threshold seals: when the floor is the problem
A threshold seal is not a bottom seal, and it is the answer when the door is fine but the slab is not. It is a heavy ribbed rubber or marine-grade PVC strip bonded to the concrete floor just inside the opening, forming a raised ridge the door's bottom seal closes onto.
It earns its place when: the slab has low spots; the driveway slopes toward the garage; snowmelt or rain runs in under the door; or the floor is uneven enough that no bottom seal can follow it. Kits run about $50–$90 for a 16 ft length, add roughly three-quarters of an inch of height for the bottom seal to compress against, and typically include anti-slip ridges and a high-visibility edge strip. Brands include GaraDry, Tsunami Seal, M-D and Xcluder.
Two honest caveats. A threshold seal creates a small bump you drive over and sweep against. And if the floor slopes inward, water can pool behind the ridge — in that case the seal is not the fix, drainage is. A threshold seal buys you a dry floor in ordinary rain and snowmelt; it does not beat water running downhill.
Side and top (perimeter) seals
The perimeter seal is a single-piece flexible vinyl or rubber strip with a built-in flange, nailed to the wood jamb down both sides and across the header. Standard single-car openings take pre-cut 7 ft jamb lengths and a 9 ft header length; a complete kit for a single-car opening runs $35–$60 and takes about half an hour per side.
The details that decide whether it works:
- Set it with the door closed. The flap should flatten slightly against the outside face of the door — too far out and it does not touch, too far in and the door binds.
- Fasten every 6–12 inches with galvanised or stainless fasteners. Regular steel nails rust out at exactly the height where water splashes.
- Snap-on and J-style vinyl versions clip over existing stop molding if your frame is sound and you just want a fresh flap.
- Brush seals handle doors that sit flush with exterior siding, where there is no standard jamb to nail a flange to.
- Replace them with the bottom seal if they are the same age. Seals degrade at the same rate, and a fresh bottom seal does little when wind is pouring through gapped jambs.
On section joints, most modern doors use a shiplap or tongue-and-groove edge that seals itself when the door closes; older and single-layer doors gain a real draft reduction from a thin joint seal. If you can see daylight between panels, that is a joint problem, not an edge problem — and if a section is damaged rather than merely drafty, panel replacement is the correct repair.
Drafts, water and energy: what sealing actually saves
Sealing is the cheapest energy upgrade on a garage, because the gap is so large: the perimeter of a double garage door runs over 40 feet, and air leaks through doors, windows and gaps account for an estimated 25–40% of heating and cooling waste in a typical home. Seals alone are credited with 20–30% of the total air infiltration in most garages, and a complete package — bottom, sides and top — is estimated to cut garage air infiltration by 70–80% in a single afternoon's work.
What that means in money depends entirely on the garage. On an attached garage with conditioned space above it, expect $80–$180 a year in heating and cooling savings in a moderate US climate, plus the fixes you cannot put a number on: a dry floor instead of a wet one, no dust film on everything you store, fewer insects and no leaves blowing across the workbench. A detached garage saves nothing on HVAC but gains all of the rest — and stops the moisture that would otherwise rust the door and the tools in it.
Will a new seal keep mice out?
Not by itself, and this is the part of the job people get wrong. Standard vinyl and rubber weather seals are built for weather, drafts and thermal insulation — they are not rodent barriers. Mice chew through soft rubber and vinyl within days, and the most vulnerable spot is the bottom corner where the seal meets the track channel.
The order that works:
- Clear the infestation first. Seal a garage that mice already live in and you are fitting a chew toy.
- Use a rodent-resistant seal. Seals with a stainless-steel mesh fill (Xcluder's fill-fabric products, RodentBLOCK EPDM seals) resist gnawing instead of feeding it. Fitted stainless shielding strips over the existing vertical seals at $12–$15 per door are the cheap version of the same idea.
- Then close the other gaps. Mice exploit openings as small as a quarter of an inch, and the door perimeter is only one of them. A new seal plus the daylight test is a good start; the corners and the jambs are where the last of them hide.
Garage door weather stripping cost in 2025–2026
DIY, a bottom seal is $15–$30 in parts and an afternoon. A full package — bottom, sides and top for a single door — is $45–$80 in materials with 60–90 minutes of work. Installed by a professional, weatherstripping a single-wide door runs $45–$100 and a double-wide $80–$180.
| Job | Typical cost | What it covers |
|---|---|---|
| DIY bottom seal | $15–$30 parts | New seal, soapy water or silicone spray, about an hour |
| DIY full package, single door | $45–$80 materials | Bottom seal plus side and top perimeter seals, 60–90 min |
| Weatherstripping, single-wide door installed | $45–$100 | Materials and labour |
| Weatherstripping, double-wide door installed | $80–$180 | Materials and labour |
| Professional bottom seal + threshold kit | $150–$300 | Removal of old seals, new bottom seal, floor threshold fitted |
| Labour only, full seal upgrade on a 9 ft door | $125–$200 | On top of $45–$80 of parts |
| Weatherstripping labour rate | $50–$150 per hour | Most jobs are 1–3 hours; no permit is normally required |
| Threshold seal kit (16 ft) | $50–$90 | Ribbed rubber or PVC strip and adhesive |
| Perimeter seal kit, single-car opening | $35–$60 | 7 ft jambs and 9 ft header, vinyl or rubber |
Parts pricing to sanity-check a quote: a retail replacement bottom weatherstrip for a 16 ft door is around $12–$17, PVC stop moulding around $16 per length, and panel joint seals $20–$40. If a quote for a single-door bottom seal comes in far above $300, ask what else is included — retainer replacement, track work or a service call fee are the usual answers, and all three are legitimate line items.
Freeze-thaw: why the seal fails first in winter
Snowmelt seeps under the door-to-floor seal, refreezes overnight, and by morning the door is bonded to the slab. Hit the opener and it either tears the weatherstripping or, in bad cases, bends the bottom section — which is why the correct move is to melt or loosen the ice, never to force the door.
- Warm water along the outside bottom edge, then a plastic scraper to help it work under the seal. Once it releases, open the door and dry the threshold with towels — drying is the step that stops it refreezing that night.
- Or warm air from a heat gun kept at a safe distance and kept moving, so the vinyl does not warp.
- Never pry the door up to break the ice. Tearing the seal turns a ten-minute problem into a replacement.
- Then treat it: a light silicone-based lubricant on the bottom seal stops it sticking to cold ground, and clearing the drainage keeps water from pooling at the threshold in the first place.
Freeze-thaw does its other damage invisibly: water enters hairline cracks in the panel finish and the joint seals, freezes, expands, and widens them over repeated cycles until the paint lifts and the steel starts to corrode. A sealed, drained bottom edge is the cheapest corrosion prevention there is.
Bottom corners chewed, or a floor no seal can follow?
Rodent damage at the track corners and chronically uneven slabs are both diagnosable in one visit — and neither is fixed by buying a thicker seal. A technician can measure the retainer, check the floor line, and fit a seal that actually closes.
Request ServiceWhen to call a professional
Weather stripping is one of the most DIY-friendly jobs on a garage door, because it lives entirely on the door skin, the retainer and the frame — it has nothing to do with the counterbalance system that makes a garage door dangerous. Call a professional when:
- The retainer is bent, crushed or corroded. It is replaceable, but it is a door-off-the-track job in some cases and it has to align with the panels.
- The door drags, binds or a seal cannot close the gap because the door is off-level or the tracks are out of plumb. No seal fixes a door that is not sitting square. Our 12-cause diagnostic covers those symptoms.
- The bottom brackets, cables or springs need touching. Those parts are under extreme tension. Stay off them, always.
- The floor is the problem. A threshold seal is the DIY answer; a slab that has settled or a driveway that drains into the garage is a concrete and drainage job.
- The door did not open and you cannot see why. A frozen or jammed door plus a strained opener is worth one service call rather than a broken opener and a bent bottom section.
Frequently asked questions
How often should garage door weather stripping be replaced?
The bottom seal is the one that wears out: figure 3 to 7 years of normal use, and as little as 4 to 5 years in a climate with hard winters. The side and top (perimeter) seals usually last 10 to 15 years because they never drag on concrete. Inspect the bottom seal twice a year — spring and autumn — and check the corners where it meets the track, which is where rodents chew first.
How much does it cost to replace garage door weather stripping?
DIY, a bottom seal runs $15 to $30 in parts, and a full bottom-plus-sides-plus-top package for a single door is $45 to $80 in materials with about 60 to 90 minutes of work. Installed by a professional, weatherstripping a single-wide door is $45 to $100, a double-wide $80 to $180, and a bottom seal plus threshold job typically runs $150 to $300.
Can I install garage door weather stripping myself?
Yes — the bottom seal and the perimeter seals are among the most DIY-friendly jobs on a garage door, because they are not part of the spring, cable or counterbalance system. The only parts that require a professional are anything involving torsion springs, cables and bottom brackets, which are under extreme tension. Work on the door skin and the frame only.
How do I know which size bottom seal to buy?
Measure the T stem on the old seal, or the channel opening on the retainer: most steel doors from the 1990s on use a 1/4 inch stem, some brands use 5/16 inch, and the two do not interchange. Standard width is 3 to 4 inches measured flat; go to 5 or 6 inches when the floor slopes or the gap is over half an inch. Length is the door width plus 2 inches — about 9 to 10 feet for a single door, 16 to 18 for a double.
Why is water getting under my garage door?
Either the bottom seal has flattened or hardened so it can no longer take up the unevenness in the slab, or the floor itself is the problem — a low spot or a driveway that slopes toward the garage. If a new bottom seal does not stop it, a threshold seal glued to the concrete gives the door a raised ridge to close onto. If water still pools behind it, the real fix is drainage, because a seal cannot outrun water running downhill.
Will new weather stripping keep mice out of my garage?
Not on its own. Standard vinyl and rubber seals are built for weather and drafts, not for rodents — mice chew through soft rubber and vinyl within days, and the bottom corners where the seal meets the track are the most vulnerable spot. Clear the infestation first, then fit a rodent-resistant seal with a stainless-steel mesh fill, or add stainless shielding strips over the existing seals.
Is a bottom seal the same as a threshold seal?
No, and they solve different problems. The bottom seal attaches to the door and travels up and down with it; the threshold seal is a ribbed rubber or PVC strip glued to the concrete floor, creating a raised ridge the bottom seal closes onto. A threshold seal is for low spots, sloped floors and water that runs in under the door — and it adds roughly three-quarters of an inch of height the door then has to clear.
How much energy does garage door weather stripping actually save?
Air leaks through doors, windows and gaps account for an estimated 25 to 40% of heating and cooling waste in a typical home, and a garage door seal is one of the biggest single gaps — a double door's perimeter runs over 40 feet. A complete package of bottom, side and top seals is credited with cutting garage air infiltration by as much as 70 to 80%. For an attached garage with a room above it, that is typically worth $80 to $180 a year in heating and cooling.
A note on scope
This is general homeowner guidance, not a substitute for a technician's on-site assessment. Costs are national-average ranges for 2025–2026 and vary by region, door size and material. Weather stripping work is limited to the door skin, the retainer and the frame: never work near torsion springs, lift cables or bottom brackets, which are under extreme tension. After any seal work, check that the door closes fully and that the opener's safety reverse and photo-eye sensors are working — UL 325 requires that protection on every residential opener, and a wrongly fitted seal or threshold can interfere with it.